Bike bottom bracket
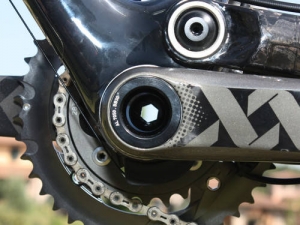
The concept of a bottom bracket is simple. It provides a movable interface that connects both sides of the crankset, allowing them to rotate while mounted in the base of the bike frame. Specifically, the bottom bracket shell is located at the joint of the chain stay, seat tube, and the down tube. The bottom bracket system greatly affects performance, as it helps transfer power directly from the rider's legs into the drive train. Proper and firm installation gives the bracket a sturdy mount to the frame, and inner bearing friction (resistance) needs to be minimized.
In efforts to reduce weight and maintain durability, new technologies were introduced and companies started to completely redesign bottom bracket assembly with their own ideas. Without any set standard, this left a chasm with many different designs, and few compatibilities. The bottom bracket market has diverged into a huge array of cartridge-mounting platforms and interfaces to attach crank arms.
Installing a new bottom bracket can be a daunting task. With the right attitude and equipment, your bike will be rolling smoother than ever.
Identifying a bad bottom bracket can sometimes be difficult, so please take some time to diagnose the whole drive train until you are 100% that it isn't the pedals, or maybe the chainring making noises. Corrosion is primarily the main source of a worn part of the bottom bracket, so you should notice the creak or crunch occurring at the same point in a rotation of the pedals where the bracket would be worn.
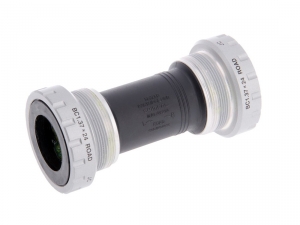
Obviously it's important to know what kind of bottom bracket you have. Older bikes have a cup and cone style, while most modern bikes have sealed cartridge bearings. If you look at the bottom bracket on the non-drive side of the bike, cup and cone bottom brackets will have a lockring with an adjustable cup while cartridges will just have a cup with a splined interface.
- Removal
Put the bike up on a repair stand
Remove the cranks to get to the bottom bracket - Two-piece cranks will be clamped to the axle with a 5mm hex bolt, while 3-piece cranks can be removed using a crank puller tool to pull the cranks from the spindle without damaging the bottom bracket.


(Threaded Cartridge/sealed bearing bottom brackets) - On the non-drive side of the bike, remove the adjustable cup lockring using an adjustable wrench or a lockring spanner. When the lockring is removed, you will find the bottom bracket cartridge bearing cup. Using the appropriate bottom bracket tool, unscrew the cartridge cup counter-clockwise.


Over to the drive side now: If you have a 2-piece crankset, note that the crank is connected to the axle and should slide easily right out of the bracket. For square-tapered spindles still in the bearing, remove the lockring with the same spanner as before. When you reveal the fixed cup, be careful to turn it correctly (clockwise). Only Italian and French bottom brackets will be opposite, and probably really tight to keep from loosening during use. Unscrew the cup with the bottom bracket tool. When the it comes loose, the entire cartridge will come out with all the guts of the bottom bracket. All you have left now is a smooth bottom bracket shell.


NOTE: Written on the cartridge will be all the glorious details needed for ordering a new bottom bracket. Purchase accordingly.

(Press Fit)
With the (2-piece) cranks removed, use a specialized bearing cup removal tool to press out the bearing cups on each side of the bottom bracket, starting with the non drive side. The Park Tool removal tool is very straightforward. Slide it through the bracket until it grabs the walls of the cup, and then hammer the tool back out the same side, taking the bearing with it. If you're not into hammering on a machine you spent your life savings, there are other removal tools to press out those bearings.


Cleanse and prepare the bottom bracket shell for reinstallation. Use a rag and degreaser solvent to remove the water, dirt, grease or corrosion from the shell. Now is also a good time to make the inside of that chainring really shine, because it's one of those tough spots to get when the bike is put back together.
- Installation
Predictably, many steps of the installation are just the reverse of what we did to remove the bottom bracket.
(Threaded Cartridge/sealed bearing bottom brackets)
With your new bottom bracket cartridge fresh out of the package, apply some anti-seize lubricant. Insert it into the bottom bracket shell from the drive side. Thread it using your fingers and to be sure there's no cross-threading going on. Tighten the cup with the bottom bracket tool until it's very snug. No need to over-exert yourself here. With the cup firmly in place, put on the lockring using an adjustable wrench or a lockring spanner.
Same thing on the non-drive side. Insert and tighten the adjustable cup with the bottom bracket tool, and put the lock ring on.


(Press Fit)
Installing a press fit bottom bracket smoothly requires a bearing press, which is a vice-like tool specialized for putting plastic cups in metal frames. Without a bearing press, there's a risk of breaking or incorrectly installing the bottom bracket. Use the press with a pair of adjustable wrenches to compress the cups into the bottom bracket shell. It's always recommended to install the drive side first, but really the important thing for this system is that the correct bearings are on the correct side of the bike. Do not over-tighten the press fit bottom bracket, but make sure it's secured on tightly. With the bracket in place, it's time to replace the axle/crankset.


When reattaching the crank arms, place the chain on the chainring as you put the axle through. With the cranks tightened down, take that bike off the stand and ride off into the sunset.
Bottom Brackets have 3 important size parameters:

- A = Spindle length: Manufactured to fit the frame and the shape of the crankset. Comes in a large range of lengths (102-140mm)
- B = Shell width: Standard sizes in road bikes can vary from 68mm to 70mm, mountain bikes from 73mm to 83mm. There are some specialized snow bikes that can support a 100mm shell!
- C = Shell diameter: ranges from 34.798mm to 46mm, although companies are starting to more commonly adapt the BB30 dimensions of 42mm.
Threaded: Bottom brackets are threaded clockwise (right hand) on the left side, and counter-clockwise on the right. This keeps the direction of the crankset always "tightening" the bottom bracket. French and Italian systems are mostly obsolete because they tighten clockwise on both sides, which leads to problems of the bottom bracket loosening during use.
Common Threaded Bottom Brackets |
|||||
| Type: | Thread pitch
tpi - turns per inch |
Adjustable (left) cup/cone direction | Fixed (right) cup/cone direction | BB Shell Width | Notes |
| British | 1.370" or 1.375" x 24tpi | Right | Left | 68mm (73mm oversize) | Applies to the majority of bikes currently in production |
| I.S.O. | 1.375" x 24tpi | Right | Left | 68mm (73mm oversize) | Interchangeable with British-style BB |
| Italian | 36mm x 1mm (25.4 tpi) | Right | Right | 70mm | Both sides of the cup are right threaded, causing the bracket to unscrew during use |
| French | 35mm x 1mm (25.4 tpi) | Right | Right | 68mm | Both sides of the cup are right threaded, causing the bracket to unscrew during use |
| Whitworth | 1 3/8 x 26 tpi | Right | Left | 71mm/76mm | |
| Raleigh | 1 3/8 x 26 tpi | Right | Left | 71mm (76mm with cups) | Usually only found on British-made Raleigh 3 speeds |
| Shimano Hollowtech II, FSA MegaExo, RaceFace X-type | I.S.O. | Right | Left | 90mm (95mm with cups) | |
| ISIS Overdrive | 48mm x 1.5mm | Right | Left | 68mm, 100mm | An open standard designed by key manufacturers to improve compatibility |
| O.P.C. "One Piece Cranks" | Male threads on crank | 68mm | Found on many older American bicycles. Requires no special tools | ||
Press-Fit: Besides threaded bottom brackets, some frames are made for external press-fit cartridges. The bottom bracket shells are manufactured without threads, which allows frame manufacturers freedom to make design changes which result in improved stiffness and weight reduction. There are variations in shell diameter standards, but many aftermarket adapters are available. For BB30, BB90 and BB95, the brackets will press right into their frame. But for many others, the bracket comes in a nylon plastic cup that gets pressed into the shell. Press-fit bottom brackets almost always use 2-piece cranksets.
Common Press Fit Bottom Brackets |
|||
| Standard | Bottom Bracket Shell Diameter | Bottom Bracket Shell Width | Notes |
| Merlin | 30mm | 68mm | |
| Thompson | 30mm, 33mm, 35mm, 40mm, 45mm | 65mm, 68mm, 70mm | 2 or 3 piece crank. Cup and cone bearings. No shoulder inside shell; loose tolerances |
| Mavic | 35mm | 65mm - 73mm | BB format clamps into a conventional BB shell once the ends have been faced with a 45-degree taper |
| Fat Chance/Gary Fisher | 35mm | 68mm or 73mm | Circlips on axle in outboard of bearings |
| Klein | 35mm | 68mm | |
| Ritchey | 35mm | 68mm | |
| Shimano Hollowtech II, FSA MegaExo, RaceFace X-type | 37mm | 90mm, 95 including cups | |
| BB90/BB95 | 37mm | 90mm, 95mm | |
| BB83/BB86, BB92 | 41mm | 86mm | 19mm or 24mm spindle |
| BB30, Cannondale System Integration | 42mm | 68mm, 73mm | Adapters will allow use with various 30mm spindles |
| BB386 Evo | 46mm | 86.5mm | |
| ISIS Megatech | 48mm | 68mm | |
| FSA Megatech | 50mm | 68mm, 73mm, 83mm | |
Crankset Interface: There are a number of ways in which crank arms attach to the spindle of the bottom bracket. In an effort to keep you kids from putting a square block in a round hole, here's our breakdown of the types of these interfaces.
Cottered: 

The classic interface design. Still widely used in many parts of the world, Cottered cranks have become a bit outdated in the modern world by other, more integrated interfaces. Essentially it has cyndrilical crank arms with a slice cut out 180 degrees opposite of each other. A cotter pin is screwed in through the crank for installation.
Square taper: 

Next in chronological order after the cottered design, this interface consists of square shaped spindle ends receive square shaped holes in the cranks. Square taper bottom brackets are durable, efficient and simple, which is why they are so widespread and popular among many lower-budget bicycles.
But not all square taper crank and bottom brackets are created equal. There are 2 main sizes, one of the Japanese Industrial Standard, and another from the International Organization for Standardization. Shimano along with other Asian manufacturers use JIS standards, while Campagnolo and European companies use ISO. Companies are building their bikes with more integrated bottom brackets these days, but bikes with square taper bottom brackets are still in production, and due to simplicity and cost effectiveness they will be around for a long time.
Splined: The most integrated system yet, splined systems are the highest quality interface. Stronger, lightweight materials combined with more teeth for a more balanced load when turning the spindle, bottom brackets last longer than ever before. There are 2 main styles of Splined interfaces.
Octalink-


Introduced by Shimano, Octalink was more advanced than any design seen before. The crank arm is cylindrical with 8 splines evenly spaced around the outside. Cranks are manufactured accordingly, meaning 8 points of contact to turn the spindle (much better than the 4 corners of the square taper system!). It should be noted that Shimano also invented the Hollowtech line of 2-piece cranksets. The spindle is attached to the drive side crank, further simplifying the servicing of their bottom brackets. All hollowtech cranksets are compatible with Hollowtech bearing units. Increased integration means a more durable interface between the bottom bracket and the cranks. Currently there are two variants of the Octalink. The V1 has grooves that are 5mm, and the Octalink V2's grooves are 9mm.
Shimano realized that the Octalink splined system would revolutionize bottom bracket and crank interfaces, and that's where things get interesting. The design was patented with intentions of owning and licensing Octalink compatibility to any other companies that wanted/needed to climb aboard. While some companies obliged, many did not, and went on to make their own splined interfaces. The bottom bracket was headed for an apocalyptic future of incompatibility.
ISIS drive-


Enter the ISIS drive, or International Splined Interface Standard. Created in 1998, major bottom bracket manufacturers such as Truvativ, Chris King, and Race Face met together to make an open standard for the rest of the industry. The ISIS drive has 10 splines that fit to compatible cranks. Most European and North American manufacturers use the ISIS drive interface.