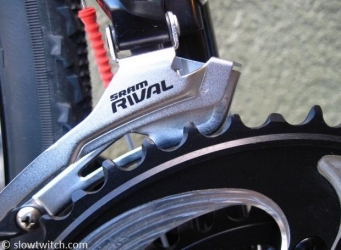
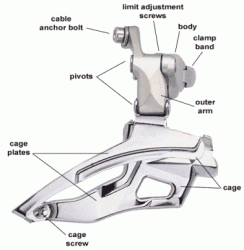
Bike front derailleur

Guiding the chain from one chainring to another is a cage of sheet metal being puppeted by the shifter cable. Unlike the rear derailleur that uses a slackened section of the chain (called the bottom run), the front derailleur works with the strained segment that is busy delivering power from the chainring to the cassette (upper run). Manipulating the chain when it is so tight can cause wear on the front derailleur, so it is important to ease up when changing the front cogs in use.

Front derailleurs can be mounted by clamp-on (to various frame sizes), braze-on (specific brackets), or a specialized Shimano E-type that mounts at both the seat tube and on the bottom bracket. Having a good front derailleur-chainring match is top priority. Proper setup is critical to everyone having a good time. The front derailleur is a sensitive component where sometimes mere millimeters determine the nightmare of rubbing on the chain or a smooth, crisp shift.
Front derailleurs are a simple component to manufacture. However, they are a precision component that can't be giving the rider no fuss when he's ripping down the road.
On the lower end, some triple chainring front derailleurs are less than $15 on Amazon.com (not including shipping). These derailleurs are generally super universal, and might be good for customization projects and the like.

The competitive drive train systems produced by companies like Campagnolo or Shimano lead to wrinkle-free front derailleurs running for more than $500 online. Chainrings on these cycles require specific derailleurs cut to exact dimensions so they can operate at their full potential.

Medium-range, more universal lines of front derailleurs (ones you might put on a buddy's bike) are sold for a median $100.
The body of the derailleur can easily be attached by the three ways mentioned earlier:

Clamp-on: There's a clamping bolt on the that tightens down over the seat tube. Careful that when tightened down completely, the body doesn't rotate to the side as it grabs the seat tube and moves around it.

Braze-on: Consistently straight when using the same mounting bracket that came on the bike from the manufacturer. If you have a derailleur body that fits into the tab slots, use the screws to maneuver it parallel with the chainring gears.

E-type: This is a style invented by Shimano that attaches to both the seat tube of the bike, but also the flange of the bottom bracket. Having more points of contact with the frame give a stronger base.

Derailleur height - most derailleurs come with a sticker with a measurement in mm. This is the gap that should exist between the tallest tooth on the big chainring and the bottom of the outside plate on the derailleur cage. Remember that sometimes the distance on the sticker might not be the best. If the chain comes off, or can't quite reach the next gear, don't be bashful about adjusting the derailleur height to what you think will work.

Derailleur angle - The derailleur should be completely parallel with the chainrings. Most mounting interfaces will be easy to adjust even though the angle of the seat tube might not be the most convenient, so it's up to you to make the proper fit.

Limiting screws - The lower limiting screw sets the derailleur to not extend past the smallest chainring, and the upper limiting screw keeps it from going to far past the high gear. Limits should be set so that the derailleur barely misses the chain. It shouldn't be rubbing on the chain, but as close as possible. If the derailleur is hanging too far from the gears, the chain is in danger of coming off. Because the lowest cog is more of a "resting" position for the derailleur, it's important to set the lower limit before anything else. Many times if the lower limit is set last, the upper limit will change, causing the need for more adjustment.

Cable tension - How tight should the cable be? Really tight. Remember that all cables are going to stretch eventually, so the tighter it's set initially the longer you can go without seeing some slack in the line. Also, a tighter system is more responsive. Be aware however, that a tense cable could cause the derailleur to wander inward and may need readjustment of the limiting screws.
NOTE: When running the shifter cable around the bottom bracket, it's recommended to add a wire bracket if you're worried about avoiding scratching paint on your ride.
Front derailleurs mount to the frame in a few different ways:
- E-type front derailleurs are special from Shimano. They mount at the bottom bracket retaining rings. E-type derailleurs can be adjusted for chain slope, but offer little vertical adjustment for any other size of chainring than the one it was designed for.

- Braze-on derailleurs mount into a special slot or tab tacked to the bike frame. Usually these are more adjustable than clamp-on derailleur designs.

- Clamp-on front derailleurs always mount to the seat tube of the bicycle. They can come in 3 different sizes:
- 1 1/8" - Standard size for many seat tubes on current road bikes, and some older mountain bikes.
- 1 1/4"
- 1 3/8"

Cable pull: Most bikes run the shifter cable around the bottom of the bike, under the bottom bracket and up to attach to the derailleur. This is called bottom pull. On mountain bikes however, shifter cables move the front derailleur from the top, to avoid debris catching and damaging the cable.
Clamp-on front derailleurs are specifically designed for certain angles of seat tubes. This is affected by frame design, and needs to be accounted for when replacing a front derailleur.
Trimming: When the chain starts to rub on the cage of the derailleur, it is necessary to trim, or slightly move the derailleur back into alignment. With the chain remaining on the current chainring, adjust the shifter a tiny amount to free the derailleur of constantly rubbing on the chain. This works like a dream in friction systems, but indexed systems are affected by the play in the shifter. Systems such as grip shifters, bar-end, or many integrated shifters are indexed on for rear derailleurs, but not in the front.

Chainring-derailleur combination that came stock from the manufacturer rarely have issues. If you need to trim, consider adjusting the alignment of the derailleur.
Front derailleurs can be combined with larger chainrings than for which they were intended. Be careful that the curvature matching on with the largest chainring , because the chain might grind on the rear of the cage, while the front part can't get close enough to make clean shifts. Friction shifting systems are easier to work with, but indexed shifters should be watched closely if working with a larger chainring that it was meant for.
Most bikes are made with either 2 or 3 chainrings. Therefore there are derailleurs built for both systems. Triple chainring derailleurs have inner plates that extend down further than double chainrings. Derailleurs from double chainrings will operate fairly normally on triple chainrings, but going vice versa requires tightening the lower limiting screw to avoid shifting onto a chainring that isn't there.
