How to Check If Your Bike Chain is Worn Out

Company: 

What is chain wear?

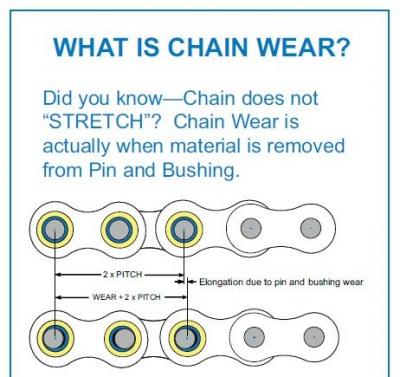
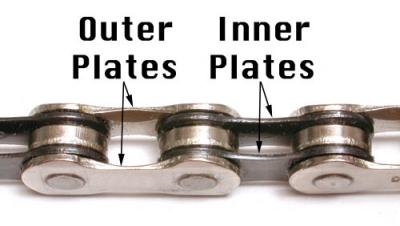
Chain wear can definitely affect your ride for the worst and can cause an accident. They wear out as a result of the rivets being pulled on by the outer plates. It’s what they call a chain stretch. The chain itself doesn’t really stretch; it’s just the plates being pulled apart.

At any rate, it’s no good so to check if there is wear. If things don’t look perfectly round or straight, that is a possible indication of damage.

Your chain is really far gone if, because they stretched and pulled so much, they don’t even sit on the sprocket teeth and ride up.

There are also a couple of methods you can use to check. One is using a chain checking tool like this one:

Park Tool Chain Checking Tool CC-3

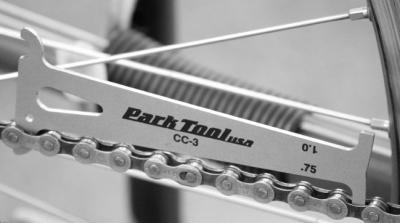
Stick it in the chain, curved side first. If the other side fits into a space on the chain, that is an indication that you will need to replace the chain. The numbers read right-side up indicate two different things: .75 indicates that it’s time to buy a new chain; 1.0 indicates that you’ll probably have to buy new sprockets and a chainring as well.

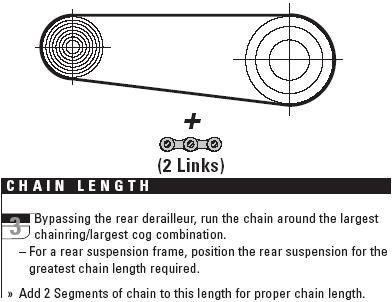
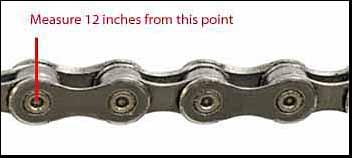
If you don’t want to shell out for a tool, you can go old school and measure. Take your chain and starting from a pinhole, measure off 12 inches of the chain. The 12 inches should hit the 12th link’s first pinhole. If it goes over by 1/16” past the mark, you’ve got to buy a new chain. If it is 1/8” past the mark, you will need to buy a new chain, freewheel and chain ring.

Bicycle Chain Wear

You’ve got to remember that if there is bad wear in the chain, it has probably screwed up your cogs and chainrings as well, wearing them down. 


How to Make Sure Your Bike Chain is the Right Length

Company: 

In order to make sure you have the right length of chain on your bike, place the new chain on the largest chainring as well as the largest sprocket. You don’t have to thread it through the derailleur just yet.

Once you’ve got that done, pull the ends together. See where they could approximately connect. Then take the longer end and count off two pinholes more. Make sure they are able to mate with the other end and normally, that means that the part that you cut with the chain tool must end with INNER PLATES. If the point of two more pinholes ends in an outer link, round up and cut at the next inner link. DON’T EVER ROUND DOWN!

Thread the chain through the derailleurs and then with your chain tool or with your master link, connect the two ends. With either case, you will probably need to pull and bend a tad the link as it will probably be a bit stiff.  

Chain Length Diagram

How to Install a Shimano Chain

Chains are where you can get a lot of grit and just plain dirtiness accumulating so it’s something you should clean and maintain on a regular basis. If you need to install a chain, remember to get one that is compatible with your system because the larger the number of sprockets you have on your bike, the thinner the chain you will need. A thin chain for a 10-sprocket bike can theoretically be used on sprockets designed for wider chains.

The inverse is not true. You cannot use a chain from a single-speed bike (wider sprocket) on a 10-speed (thinner and multiple sprockets).

First, to install a Shimano bike chain, you’ll need to size the chain. To do that, you’ll need to click the shift levers so that the front derailleur is on the largest chainring and the rear is on the smallest sprocket. Thread the new chain over the big sprocket and chainring. You don’t need to thread it through the derailleurs just yet. Measure off where the chain meets and then count two pin-holes of extra chain links. REMEMBER: you must cut the chain so that it ends with the inner plates and not with the outer plates. If the measurement lands right on a link with outer plates, cut the chain one link up so you end up with inner plates and not outer ones. Shimano uses a special connecting pin that has a break-away guide that comes with the chain. This is what you’ll use to connect the chain, once it is threaded on the chainring and the derailleur.

Bike Chain Inner and Outer Plates

Use your chain break tool to cut the chain and then proceed to properly thread your chain through your derailleurs. Now, with your chain tool, press the connecting pin into the link. The break-away guide will either break off or you will have to snap it off with the chain tool.

How to Overhaul a Threaded Headset

When you want to overhaul your threaded headset, remove the handlebar stem and use a wrench for the locknut. Remove the spacers and the top race. Check the races for pitting. Remove fork and bearings. The bearings are normally in casings. Check these for pitting too (though because they are cheap, you could just as well buy new ones). Clean everything. 

Once you've checked what is still usable (hopefully everything), turn the fork over and start with the bottom first. Put in grease, your bearings and then the fork. Secure the fork to the frame and flip the bike over, right side up.

Repeat with the top. Grease everything: locknut, bearings, anything that has a thread. Put your spacers on, followed by the locknut. Wipe off any excess grease that may still be on the bike.

Wrench the locknut tight and then test out your fork. If it doesn't turn smoothly, you'll have to see where you went wrong with previous steps.

How to Install a Threaded Headset

A headset is basically the piece that holds the fork to the frame of a bike, thereby allowing for steering. A sealed bearing headset normally has a plastic or rubber gasket to protect the insides from dirt.

There are a lot of special tools you can use for the installation. If you don’t want to shell out a grip of change for these tools, which may be a little out of the reach of your wallet, there are cheaper alternatives (a wooden block and a hammer, for instance). Worst comes to worst, you can always ask your local mechanic or read some bike books for tool cheats.

Park Tools makes these:

Fork crown facing tool

Headset facing tool

Headset press

Digital caliper

Hammer

Grease

To install a threaded headset, you are going to place the bearings first, both top and bottom, on the opening where the fork is supposed to enter. There are integrated bearings in some frames as well, so you don’t have to worry about them falling out from the bottom. Put on the spacers, the headset and the dust cap.

The threaded headsets have a threaded bearing race and a locknut that fit on the threaded steering column. 

Threaded and Threadless Headset Diagram

Note: The video explains the overhaul so the reassembly starts at 1:48.

Replacing Your Mountain or Road Bike Brake Pads: When Do You Have to Do It and How?

Company: 

Your brakes are hardworking pieces of your kit that you need to check on regularly. You may not think it but bits and pieces of gravel can get stuck in your pads, causing scratches on your rims.

For v-brakes, what you need to do is to grip the calipers and unhook the noodle, as you would when you take your tire off. With an allen wrench, remove the brake pads.

What I hate is that very few mechanics know how to properly toe in a brake pad. The theory is that the front edge of the pad should be the edge that touches the rim first. If you don’t do it right, you get that annoying squeal when braking. You also have to line up the pads so that they sit completely on the rim and not slightly off the edge. If it’s too far off towards the spokes, you’ll develop a lip on your brake pad from the wear and may cause the brakes to stick. If it’s too far off towards the tire, there is the possibility of flatting as well as creating a lip.

Saul, the mechanic in the first video, is using a Tacx Brake Shoe Toeing Tool to do the job.  

In the second video, Todd gives a very thorough explanation on how to replace disc brake pads. Try to avoid contact since the oils from your hands and fingers can contaminate the pads and the rotors.

For your disc brake pads, remove the wheel and put in the spacer. It is important because sometimes, people erroneously squeeze the brake levers when the wheel is removed. What they don’t know is that since the disc brakes nowadays have self-adjusting systems, they will grip past the point where a rotor can fit and it will be very hard to separate the pads. 

How to Install Hydraulic Disc Brakes

Installing disc brakes is more often than not, a considerable upgrade for anyone who is serious about their mountain biking. You won’t have to worry about wearing down your rims and about trying to break when it’s wet outside.

That said, back in the day, it would have been real difficult to adapt a v-brake bike into a disc brake because disc brake manufacturers did not make them to be compatible with other systems until the introduction of the Six-Bolt International Standard (I.S. for short) in the mid 1990s. So if your wheels are older than that, buyer beware.

I’ve scoured for a decent video for this tutorial and this really was the only one that went into it at depth. The problem I have with it is that the mechanic should have been using gloves when installing the rotors. Fingers secrete oils and if they get into the brake pads, they will reduce in efficiency. And if you brake and contaminate the brake pads with the oil from your hands, you may be off to the store buying new ones. If you do end up touching the discs, wipe them down with solvent and then, with a dry corner of a rag, wipe it down again.

The video is for Avid hydraulic brake installation.

Affix your rotors to your wheels, remove the v-brakes, mount the hydraulic caliper brakes and measure out your housing. 

And use gloves when handling the rotors. Better safe than sorry. 

How to Bleed Shimano Hydraulic Disc Brakes

Company: 

Hydraulic brakes work by applying pressure to a liquid in a tube. They work by means of a piston in the lever which shoots liquid into the caliper piston which causes the brakes to clamp. Because there is no stress caused, hydraulic brakes are considered more efficient and, in turn, more costly. If you ride hard on a regular basis, dirt and moisture can mix with the fluid, reducing the efficiency and so it is recommendable that you bleed your hydraulic disc brakes once a year. You’ll know you need to bleed them when there is no resistance when you grip your brake.

There are two types of fluid used for hydraulic disc brakes: DOT (Department of Transportation) approved automotive fluid and mineral fluid. THEY ARE NOT INTERCHANGEABLE. If you use the wrong fluid for your type of brakes, you will screw them over and your braking will be faulty. Now, you’ve got to remember that automotive fluid is toxic and can take the paint off your frame so be very careful with the handling. Make sure you wear gloves, work in a well-aired space and keep rags around the bleed area. Wipe off anywhere that has fluid, regardless of whether it is mineral or automotive, and wash the area with soapy water or alcohol after you’re done.

So to start, you’re going to want to set up your bike on a stand, remove your tires and take your brake off from the frame. You’ll want to remove the brake pads, the pin securing the pads and put in the shim or the caliper block in the caliper to hold the pistons apart. If you don’t have one, use a clean 10 mm hex wrench. Depending on whether you got the Shimano brake bleed kit or are doing it without will determine from where you start the bleed. With a Shimano kit: the bleed starts from the caliper up towards the lever (as shown in the video). Without: the bleed starts from the lever down towards the caliper.

Attach the bleed tube and the waste bottle (or syringe) and secure with a box wrench. You are going to want to open the reservoir above the lever so turn it so that it is level with the ground before opening. Remove the cap and the bladder and then give your wrench at most a ¼ turn to allow the fluid to flow smoothly.

If you are doing it with a Shimano bleed kit, depress the plunger to fill the reservoir with more fluid. If you are doing this without one, as soon as you open the bleed nipple, allow gravity to let the fluid drain from the reservoir to the waste bottle that is (hopefully) attached at the caliper end.

Start with only a little bit (5-10 cc) and then, suck it all back into the syringe. This is in order to make sure all the air bubbles that could have been trapped somewhere inside the mechanism is sucked back out. Once in the syringe, it’ll rise to the top near the plunger. Either way, you’ll want to keep at the process until the fluid is clean and you’ve got all the bubbles out. Try out the brake and see if there’s tension. Basically, just keep the draining process going until gripping the lever offers resistance. 

How to Adjust and Straighten Disc Brakes

Company: 

Adjusting disc brakes is pretty straightforward. What you’ll need is a rubber band and an allen wrench.

Yep. That’s it.

To start, you’ll have to slightly loosen the mount bolts that attach the caliper to the adaptor. Once done, put the rubber band on the brake lever, causing it to close. This will align the caliper over the disc.

This is where you can fiddle around and tighten a tad so that you get the adjustment right. Once you’ve got that, you can take the rubber band off to hear how the wheel spins. If you still need to adjust, fine tune via the mounting bolts. Check and see if the distance between the disc and the both brake pads are even.

Tighten and you’re done!

In order to straighten lightly bent disc brakes, you are going to need one of two tools: a disc brake rotor tool or (if you don’t want to shell out the coin for this specialty tool) an adjustable wrench will do you nicely. Make sure it doesn’t have teeth and is flat so that it won’t leave marks on your rotor.

Once you’ve found the bent bit, use the tool of your choice to straighten. Once you’ve gotten it more or less straightened and the disc isn’t rubbing against any surface, you are pretty much good to go. 


How to Install a Sealed Bearing Headset

A headset is basically the piece that holds the fork to the frame of a bike, thereby allowing for steering. A sealed bearing headset normally has a plastic or rubber gasket to protect the insides from dirt.

There are a lot of special tools you can use for the installation. If you don’t want to shell out a grip of change for these tools, which may be a little out of the reach of your wallet, there are cheaper alternatives (a wooden block and a hammer, for instance). Worst comes to worst, you can always ask your local mechanic or read some bike books for tool cheats.

Park Tools makes these:

  1. Fork crown facing tool
  2. Headtube facing tool
  3. Headset press
  4. Digital caliper
  5. Hammer
  6. Grease

To install a sealed bearing headset, you are going to place the bearings first, both top and bottom, on the opening where the fork is supposed to enter. There are integrated bearings in some frames as well, so you don’t have to worry about them falling out from the bottom. Put on the spacers, the headset and the dust cap and screw it all down.