After a while, your cables will need a little work. If you live by the ocean, have wet weather or ride through mud, you’re going to have humidity issues and possible rusting going on. And in order for your gears to work, your derailleur cables need to be in tip-top shape.
Here’s how you can string them.
First things first: derailleur cables and brake cables are NOT interchangeable so please make sure you get the proper cable.
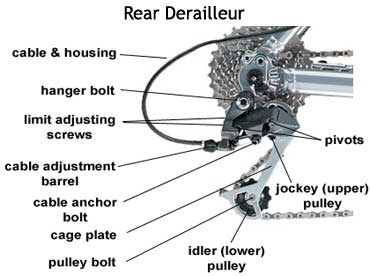
Next, move your chain down to the smallest cog on the freewheel so that the cable has the least amount of tension on it. Clip off the ferrule (or the end cap) that is nearest to your derailleur, untighten the anchor bolt to release the cable and proceed to remove the cable and the respective housing off the bike.
Measure off the cable and the housing. If you have wound cable housing, make sure you have proper cutters for the job.
If the housing is too long or too short, there will be kinks, which won’t allow for proper shifting so allow for a slight curve so that the cable has room to move. Make sure when you get to the rear tire that the loop before it enters the derailleur is a nice half circle and enters in as straight as possible line. Failure to do so will result in twisting the end cap. As mentioned previously, the housing will need a little extra length so that it can actually move.
Start with the shifter and work back across the bike. When you insert your cable through the shifter and housing, you may need to grease it very lightly so that it passes through with ease. Once out the end and through the derailleur, pull the cable by hand. Tighten the anchor bolt. Pull on the cable on the top tube so that the housings settle into their respective spots. There will be give in the cable that you were tugging on so tighten the cable by hand again.
Snip and crimp the loose end of the cable.