Bike suspension
suspension Fixes, Reviews & Guides
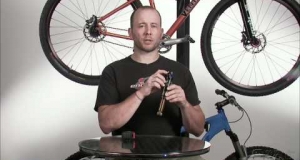
How to Set Up a Fox Rear Shock on a Bike
Today we're going to walk through the basic steps to get you set up with the Fox RP 23 rear shock. The following few steps are essential so that you can get the best performance...
Type: Repair Tutorial
A suspension system insulates the bike and rider from impacts when riding over rough terrain, which is why it's mostly used on mountain bikes. Normally, suspension consists of dampening mechanisms like a large spring in the middle of the frame, as well as smaller coil shocks and air-tight valves used in the front forks.

Besides helping rider comfort, suspension systems create stable traction by keeping the bike in more frequent contact with the ground. They also help protect the bike from being damaged by providing a cushioned level of support while riding.
Some common terms when talking about bike suspension:
- Travel: the distance the axle moves throughout the range of the suspension
- Preload: initial tension on suspension springs before external loads are applied. Soft suspension has a less preload, and very rigid suspension has a high preload.
- Rebound: refers to the speed at which the suspension returns to its initial state after an external shock. Rebound dampers vary the rebound speed, possibly causing the shock to return to normal more slowly.
- Sag: The resting height of the suspension with the rider included. This is taken into consideration for adjustment.
- Lockout: Toggle-like mechanism that bypasses suspension in desired situations that require a more rigid frame. Some lockout systems have a cancelation feature that activates under sudden unexpectedly high loads (like crashing) to protect the bike and rider.
- Bob and squat: Phenomenon that occurs when the suspension responds to the pedaling of the rider, robbing some acceleration power.
- Pedal feedback: With the rear axle moving (and therefore changing the angle in relation to the bottom bracket), the chain is tightened and shortened. This is felt as torque that is opposite to pedaling when riding.
- Compression dampening: slowing down the rate of shock compression by forcing fluid (air or oil) through a valve. Resistance at the valve vary, and can sometimes be adjusted, therefore softening or hardening the ride.
- Unsprung mass: Refers to the collective body of components unsupported by suspension. In the case of mountain bikes, this means only the wheels and other minimal parts below the shocks, but road cycles having no suspension system are nearly 100% unsprung mass. When the rider lifts from the seat, his/her knees provide shock absorption therefore rendering them sprung mass.
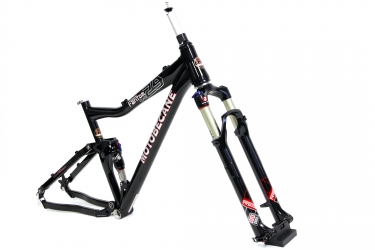
Even the most inexpensive mountain bikes come with suspension forks. That being said, if you're looking to purchase and install a new suspension system, be prepared to open your wallet, because it's a critical component to the performance of your ride. Many mountain bike component companies lead to a diverse market with large fluctuation in pricing and value.
Rear shocks are generally easier to manufacture, and it can be said they are cheaper than front fork suspension. Simple coil-sprung rear shocks lay under $100, but more adjustable systems of air and coil compression blow up over $1,300 on Amazon.com.
Front forks are sometimes the only thing that keep your wrists attached. If someone were serious about downhill cycling, directing the majority of their finances here isn't a bad idea. As one might imagine this important component can be very spendy. Low-end forks can be just under $100, but the average price is around $500 and they top out on Amazon for over $2,200. Pocket change.

It's possible to build-your-own (and kits exist), but many suspension systems come pre-assembled and ready for install. To swap your forks, you will need these tools:
- Crown Race Puller
- Torque wrench
- Tape measure
- Repair stand
- Hammer
- Screwdriver
- Allen wrenches
- Star nut setting tool
- Hacksaw
- Saw guide
Let's get started:
Removal
Put the bike securely on a repair stand.
Remove the front wheel and disconnect any brake lines
Remove the top cap on the headset and loosen the stem bolts.
The old steerer tube should slide out, but it is very important to maintain the order of the headset components. The old forks should be free and clear of the frame.

Take the crown race from the old set of forks using the Crown Race Puller. It will need to be inserted on the new forks to give bearing to the headset when they are installed . Misuse of the crown race tool can damage the forks or the crown race itself.
Installation
Steerer tubes are manufactured long enough to fit any custom build imaginable. They are expected to be cut to the right length.

With the bike still on the stand, assemble the headset again by putting the new forks though the head tube. Put on the crown race, the spacers and the stem. With everything connected, mark with a pencil or sharpie where the excess steerer tube begins above the stem. The cut will be 4mm below this mark to make sure the steerer tube fits within the stem reasonably. Remove the forks and prepare to cut.

Secure the forks on a workbench, and measure and make a new mark 4mm below the current line on steerer tube.

Using the hacksaw and sawguide, cut the forks 4mm lower than the mark made. File the rough edges after the cut for a professional finish.
With the forks now cut to fit your bike, the final piece is to install the star nut (on threadless headsets). This is what the top cap screws into to keep the forks from falling out the bottom. Secure the forks a repair stand. Park Tool makes a good installation tool, but for those of us on a budget, you can run a screwdriver through the center of the star nut, and lightly hammer it down into the steerer tube about an inch. There isn't a standard distance the star nut needs to be, just shallow enough for the the top screw to grab on to it.
Install the steerer tube through the headset, apply the spacers and the stem, and screw down the top cap to secure everything in place.
Replace the front wheel and the brake lines, and the job is complete.


Road bikes in theory don't need a suspension system. The riding surface is smooth, stable and paved. It's a matter of high speeds on a smooth surface, so the rider needs an extremely rigid frame in which to power themselves to victory.

Mountain bikes are the inverse. The terrain is rough, loose and vertical. Predecessors to today's full-frame suspension designs were simple fork shocks. Aiding in keeping the riders arms from bucking off the handlebars, fork springs simply improved handling of the bike ten-fold. Modern designs incorporate more fragmented frame styles that use springs and valves to make the whole bike more fluid when ripping up the trail. Many riders still prefer more rigid framework, but it's undisputed that more contact means more control.
Suspension comes in either coil sprung or air sprung systems. Modern bikes have many external controls for compression and rebound of the shock.

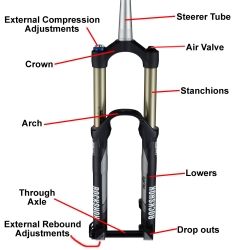
The front forks: Two telescopic tubes within which are spring and dampening mechanisms.
Anatomy of a fork:
- Top Cap: Upper seal of the stanchions.
- Valves: Internal fork components that sustain a limited flow of fluid, dispersing the force of a shock to a controlled level.
- Crown: The structure that holds the stanchions together and attaches them to the steerer tube.
- Fixing bolts: Bolts in the end of the fork that keep the guts from falling out.
- Lockout lever: Slows the flow of hydraulics through internal valves, stiffening the fork completely. Most have a bypass valve to engage the suspension for unexpectedly hard landings.
- Preload adjuster: Increases the initial spring resistance of the fork.
- Rebound dial: Dampening adjuster used for increasing or decreasing the speed at which forks rebound to their initial state.
- Seals: Insulators that keep dirt out and components in.
- Slider: The bottom fork tube that moves in telescopic relation to the stanchion
- Spring: Provides shock absorption using air, coil, elastomer or all the above. Can be in one leg or both.
- Stanchion: The upper tube that is anchored in place with its connection to the frame. Slider tubes move slowly over the stanchion tube providing firm cushion.
- Travel adjuster: Varies the distance which suspension ranges in support.
Rear shock: Shock absorber built into the center of the frame, usually in the seat tube.
Anatomy of a rear shock
- Valve: Used for adjusting air volume on air shocks.
- Bottom-out bumper: Usually a rubber pad to protect the hardware at full compression
- Coil: Metal spring to allow fluid movement throughout.
- Compression adjuster: Dial that can vary the compression speed of the shock.
- Lockout: A damping mechanism that bypasses compression from low-speed impacts such as pedaling forces.
- Piggyback chamber: Extra expansion chamber that increases the volume which air shocks can compress.
- Preload collar: Threaded ring on coil shocks that temporarily loads the spring. Competitive downhill cyclists use it for a firmer start.
- Rebound adjuster: Dampening mechanism for shocks returning to their initial state.
- Seal: Keeps the components in and the dirt out
- Sleeve: Cylinder containing a finite quantity of air that absorbs turbulence when compressed. Chamber dimensions can be adjusted to allow for harder or softer suspension.
