Tools for the job
2.5 weight suspension fluid
Torx keys
Reverb bleed syringes
Paper cloth
Degreaser
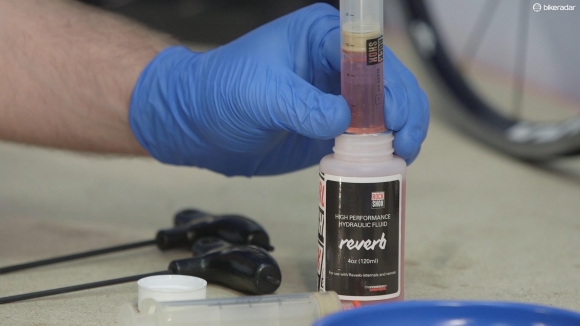
It’s important to note that Reverb dropper posts require a specific 2.5 weight hydraulic fluid that’s not the same as brake fluid. So make sure you purchase the right product – it will come as part of a bleed kit though.
How to bleed a RockShox Reverb dropper seatpost
1. Prepare
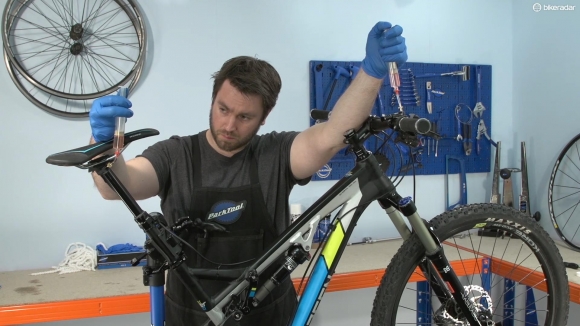
Fully extend the Reverb, then adjust the angle of the bike so that the actuator is higher than the top of the post – you may find this easier to do if you clamp the bike in a workstand.
Adjust the angle of the bike so that the actuator is higher than the top of the post: adjust the angle of the bike so that the actuator is higher than the top of the post
Undo the mounting bolt, and position the actuator so the bleed port is at the highest point, then turn the speed adjuster to the slowest position.
Fill one of the syringes three quarters full – hold it upright and gently push the plunger to remove any air bubbles.
Hydraulic Fluid
Fill one of the syringes three quarters full: fill one of the syringes three quarters full
Remove the actuator bleed screw and attach the filled syringe. Undo the lug screw on the seatpost and screw in the other, empty syringe.
2. Purge system
Hold both syringes bottom-up and gently push on the the one with fluid in while easing the plunger on the other one out.This forces any air that is present in the system into the empty syringe.
When you have emptied the syringe on the actuator side, unscrew the now-full syringe from the seatpost, give it a tap and remove any air from it. Screw it back in and push the fluid back through the system as before, pulling up on the syringe that is being filled.
Again, make sure the syringes are upright – cycle the fluid between them until there is no air flowing in as you pull the plunger out.
Cycle the fluid between the two syringes until no air is flowing in as you pull the plunger out: cycle the fluid between the two syringes until no air is flowing in as you pull the plunger out
When you’re happy there is no more air in the system, push in the seatpost side fully and unscrew, then return the bleed screw.
Bleed actuator
Hold the syringe upright, as before, and gently pull on the plunger to ensure there is no more air present. Press in the actuator while pulling up on the plunger of the syringe, then push down on the plunger as you allow the actuator to return to its normal position. Repeat this process five to 10 times to ensure there is no air inside the actuator.
Turn the speed adjuster fully to the fast (or '+') position, then back to slow – repeat this three times and leave in the fast position (or '+') direction. Again, pull up on the plunger to remove air.
Push on the plunger and return the speed adjuster to the slow position. Push in the actuator, then apply pressure on the syringe, slowly releasing the actuator to its extended position. You can now unscrew the syringe and return the bleed port screw.
Clean up any oil with paper cloth and degreaser, and return the actuator to the desired position on the bars.
Clean up using degreaser and paper cloth: clean up using degreaser and paper cloth
You can now set your seatpost to the required height and adjust the speed controller. Finally, give the system a test and you’re ready to ride.