This video will show you a method for loading spokes on to SRAM XO hubs when you are building wheels.
XO hubs have a unique flange shaped design, which yields a much stronger and robust wheel set in the end. This design requires a slightly different approach when loading spokes into the hubs for wheel building.
Load your first spoke on the drive side flange. If you like to build your wheels with the XO logo aligned and centered with the valve hole on the rim for 32 hole hubs, insert your first spoke just to the left of the SRAM logo on the hub shelf.

Insert First Spoke on Front Hub Just to the Left of Sram Logo on Hub Shell
Insert this spoke into the 4th hole to the right of the valve stem on the rim.
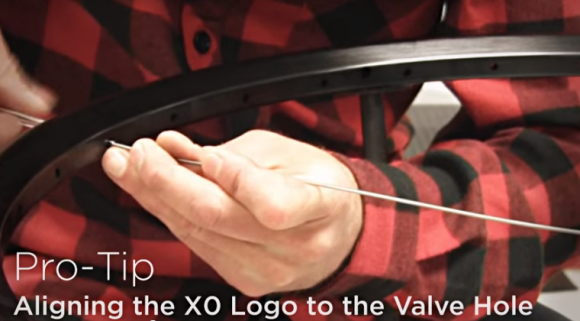
Insert First Spoke Into the 4th Hole to the Right of the Valve Stem of the Wheel Rim
For rear hubs, your first spoke should drop in two holes over from the tip of the X on the XO logo on the hub shelf. Just like the front hub, insert this spoke into the 4th hole to the right of the valve stem.
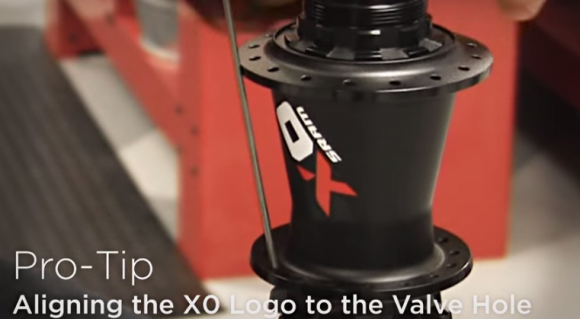
Insert First Spoke on Rear Hub Two Holes Over From Tip of X of the Logo on the Hub Shell
Use a little bit of pressure with your thumb, flex the spoke inward, and it will drop right in. Repeat 8 times for your drive side flange spokes.
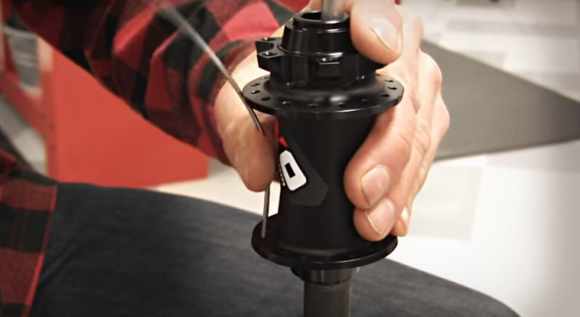
Put Pressure on Spoke to Allow it to Drop In to Drive Side Hub Flange
Now move to the top flange. The top flange spokes will insert without any interference.
Once you have your first 16 spokes loaded into your hub, start installing the nipples onto the spokes. Once they are loaded into the wheel, flip it over, and start with the other side.
Once you’ve flipped your wheel, start installing the next set of 8 spokes in this bottom flange. Using the same method to get the spoke to drop through. A little bit of extra flexing will be required for one or two of these holes. Once you get the 8 bottom spokes loaded, you can finish up with your top 8 spokes and the top flange. Then complete lacing your wheel and installing spokes.
Once you have your final 16 spokes loaded you can start installing nipples on to those spokes and finish up lacing your wheel. Once this is done, you are ready for final tensioning and truing.