Fix Noisy Road Cycling Shoes with Cleats

Bike Category: 

Cleat squeaks can come from a number of different sources such as the cleat to shoe interface, the cleat to pedal interface, or from the binding mechanism housed in either the pedal or cleat. We'll address these issues one at a time. With the quick lessons shown in this video, noisy cleats will be a thing of the past. Don't forget to explore the rest of our Learning Center for more great instructional videos. Once your bike is all set up, make sure none of your components will hold you back. Check out our wide selection of bicycle components over at ArtsCyclery.com.

Step 1: Tighten down the cleat to the manufacturer's recommended torque value to limit cleat flex and the creaking it generates.

Tighten Cleat

Step 2: Greasing cleat bolt threads and underneath the bolt head can also help to quiet down flexing cleats.
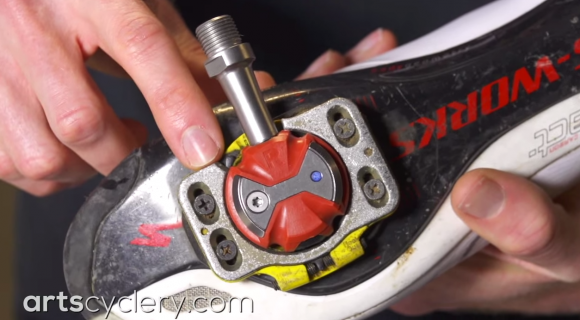
Step 3: If you use Speedplay pedals, make sure that your cleats are properly shimmed so that they do not become warped when they are tightened down, as this is a common source of creaks.
Step 4: At the cleat to pedal interface, most creaks are the result of worn out cleats that rock on the pedal body. If the colored wear areas on your cleats are worn down, it's a good time to replace them.
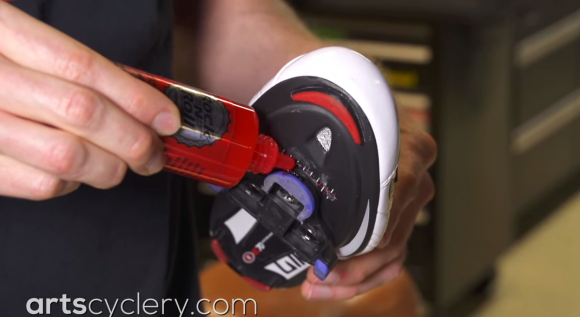
Step 5: Lubricate the contact points where the cleat and pedal meet with a dry chain lube. Rock ÔN Roll Absolute Dry chain lube is a good example of the type of lube you want to use. Just keep in mind that a little goes a long way and that you need to wait for the solvents to evaporate before you ride in order for the lube to remain in place.

Grease Cleat Threads

Step 6: Follow this same procedure on your cleats if you use Speedplay pedals. Clean out the spring/cleat interface and then lubricate it with a dry lube.

Overview of Bicycle Pump Heads and Tube Valves

Bike Category: 

Bike maintenance is something we take seriously here at Art's Cyclery. We want to make sure your bike functions perfectly every time you go out for a ride. Whether you're riding mountain or road, we'll be there every step of the way to make sure you have the best cycling experience possible.

Presta Valve

Air doesn't escape from your tire at all. There's a common misunderstanding of where the lost air is coming from when you remove the pump head from the valve, as it's likely all from the pump hose itself.

Presta Pump

With a Presta valve, the air pressure inside the tube is what keeps the valve shut. When the pressure inside the pump is greater than the pressure inside the tube, the valve opens and air flows into the tube until the pressure equalizes. This design ensures that there are no moving parts inside the pump head required to push the valve open when pressurizing the inner tube that could then hold the valve open during the fraction of a second that the pump head seal is broken and the valve core is depressed.

Us mechanics here at Art's Cyclery prefer to use Presta specific pump heads because they do not have the internal mechanical component that holds the valve open, unlike most dual purpose pump heads that are designed to work for the Presta and Schrader Valves.

Fix a Damaged MTB Chain

Bike Category: 

Breaking a chain is everyone's worst nightmare but in reality it only slows you down if you don't have the tools and know-how to repair it. This informational video shows you how to repair a damaged mountain chain using a homemade chain tensioner tool. Be sure to check out the first video in this series where we show you how to make the chain tensioner tool out of a coat hanger. The faster you get this trick down, the faster you can get back to riding. Then, when you finally get back home from that long ride, be sure to check out Art's Cyclery for a brand new mountain chain.

Step 1: Identify the damaged links and move the rear derailleur into the forward and locked position.

Step 2: Use a chain tool to remove the chain pin of the last link of the section of damaged chain and Òbreak the chainÓ.

Chain Tool

Step 3: Identify where the damaged chain starts. Make sure to match the new, undamaged starting link with the link you removed previously. Use a chain tool to only push the pin out partially so you can re-use it.

Step 4: Use the homemade chain tensioner tool to hold the chain together. Orient it on the top of the chain so you can work on the chain.

Chain Tensioner

Step 5: Push the pin back into the chain using the chain tool and make sure your chain flexes freely.

Applying Finishing Tape on Handlebars

Bike Category: 

Bike maintenance is something we take seriously here at Art's Cyclery. We want to make sure your bike functions perfectly every time you go out. Whether you're on a mountain bike, or a road bike, we'll be there every step of the way to make sure you have the best experience possible. While there are many great methods to wrap finishing tape, this method has worked well for us without fail. Most finishing tape issues stem from using the finishing tape to cover both the handlebar tape and the handlebar. Because the taped portion of the bar is uneven and larger in diameter than the handlebar, the finishing tape has to be stretched to achieve a wrinkle free application. The adhesive on the finishing tape is not strong enough to hold this position and nearly always ends up unwinding and losing tension.

Loose Tape

Our way around this is to apply the finishing tape to the handlebar tape only. Electrical tape will work just fine with this method. Just be sure to choose a high quality tape from a reputable brand like 3M. The good tapes have better adhesive and conform better to irregularities in the handlebar tape. You'll be able to have that perfect, pro look to your handlebars with our finishing tape tutorial video. Don't forget to explore the rest of our Learning Center for more great instructional videos. Once your bike is all set up, make sure none of your components will hold you back.

Handlebar and Tape

Step 1: We'll start the installation by cutting a long tail on the tape that creates a square edge to the end of the handlebar tape. This tail should extend roughly all the way around the bar.
Step 2: Apply the electrical tape to the tail of the handlebar tape about an inch up from the tip. Pull the tape tight and begin wrapping the handlebar.
Step 3: We like to make a total of 3 laps around the bar, so begin by pulling the electrical tape tightly enough that it stretches just a little for the first 2 laps. Then, for the last lap I don't stretch the tape at all. This prevents the tape from unraveling and leaving a mess on your handlebar.
Step 4: Cut the tape so that the seam is on the underside of the bar just in front of the cables. If you go over the cables, that bulge will make the edge of the finishing tape want to peel off, so just avoid it.
Step 5: Now go ride and get that new tape dirty!

Measuring Correct Bike Handlebar Width

Bike Category: 

Proper handlebar width often comes down to personal preference but, if you need help getting started, let Jerald show you how in this quick video. Learn how to measure your shoulder width properly and then how to use this measurement to determine the right width handlebar to use on your road bike. This quick and easy process takes out all the guesswork and allows you to take one step closer to that perfect fit. Once have found the right road handlebar width for you, you can check out the wide variety of handlebars at Art's Cyclery.

Quick Measurement

Step 1: Place a handlebar up to your shoulders to see how closely it aligns with the outside edge of your shoulders. This is a crude way of estimating your proper handlebar width.

Step 2: For a more detailed measurement, have a friend find the bony protrusions on the front of your shoulders.

Detailed Measurement

Step 3: Measure the distance between these bony protrusions with a tape measure.

Step 4: Take this measurement in centimeters and add 2 centimeters to account for your arms naturally radiating outward in your riding position.

Correctly Fit a Bicycle Helmet

Bike Category: 

Let Luke show you the ins and outs of finding a perfect fitting helmet in this informative video. You'll not only learn how to determine which size to buy but also where the helmet straps should go and other crucial components of that perfect fit. Using these simple techniques, you can find a helmet that keeps you safe and makes you look great on your next ride. After you've finished watching, don't forget to start your hunt for that proper fit with the great selection of helmets available for online purchase at Art's Cyclery.

Step 1: Tuck the straps out of the way and open the retention system and place the helmet on your head.

Tighten with Retention System

Step 2: Observe the distance between the helmet and your temple as well as the distance between the helmet and the back of the head. This should be no more than finger width. The fit should be snug but comfortable.

Little Room on Helmet Sides

Step 3: Clip the chinstrap closed and dial in the fit so that the straps come together just below your ear at the jawline. You should be able to place two fingers under the strap at the chin.

Step 4: Make sure there is little to no movement when you shake your head and adequate coverage for the forehead. Two fingers between the eyebrows and the helmet is a good rule.

Measuring for Correct Saddle Width

This simple instructional video will show you how to measure the width of your sit bones at home so that you can find the right saddle width for you. A saddle that is too narrow can cause pressure on sensitive areas while a saddle that is too wide will cause uncomfortable rub. Finding a saddle that is the proper width can alleviate these painful problems but it is only a start. Watch the second video in this series, discussing how to find the right saddle shape, and you'll have all the know-how you need to finally find the most comfortable saddle for you. Be sure to check out our wide selection of available saddle widths and shapes at Art's Cyclery!

Step 1: Gather the proper materials. You will need chalk or crayons, a tape measure and a piece of corrugated cardboard.

Run Chalk Over Cardboard After Sitting

Step 2: Place the piece of cardboard on a bench and sit down on the cardboard with your feet elevated to mimic your riding position.

Step 3: Stand up and use the flat side of a piece of chalk or crayon to color in the cardboard. The depressions made by your sit bones will be visible against the colored surface.

Step 4: Measure the distance between the centers of the two depressions left in the cardboard in millimeters.

Measure

Step 5: Take that measurement and add 25-30mm to find your ideal saddle width.

How To Service A RockShox Reverb Dropper Seat Post

Bike Category: 

Tools for the job

2.5 weight suspension fluid
Torx keys
Reverb bleed syringes
Paper cloth
Degreaser
It’s important to note that Reverb dropper posts require a specific 2.5 weight hydraulic fluid that’s not the same as brake fluid. So make sure you purchase the right product – it will come as part of a bleed kit though.

How to bleed a RockShox Reverb dropper seatpost

1. Prepare

Fully extend the Reverb, then adjust the angle of the bike so that the actuator is higher than the top of the post – you may find this easier to do if you clamp the bike in a workstand.

Adjust the angle of the bike so that the actuator is higher than the top of the post: adjust the angle of the bike so that the actuator is higher than the top of the post
Undo the mounting bolt, and position the actuator so the bleed port is at the highest point, then turn the speed adjuster to the slowest position.

Fill one of the syringes three quarters full – hold it upright and gently push the plunger to remove any air bubbles.

Hydraulic Fluid

Fill one of the syringes three quarters full: fill one of the syringes three quarters full
Remove the actuator bleed screw and attach the filled syringe. Undo the lug screw on the seatpost and screw in the other, empty syringe.

2. Purge system

Hold both syringes bottom-up and gently push on the the one with fluid in while easing the plunger on the other one out.This forces any air that is present in the system into the empty syringe.

When you have emptied the syringe on the actuator side, unscrew the now-full syringe from the seatpost, give it a tap and remove any air from it. Screw it back in and push the fluid back through the system as before, pulling up on the syringe that is being filled.

Again, make sure the syringes are upright – cycle the fluid between them until there is no air flowing in as you pull the plunger out.

Cycle the fluid between the two syringes until no air is flowing in as you pull the plunger out: cycle the fluid between the two syringes until no air is flowing in as you pull the plunger out
When you’re happy there is no more air in the system, push in the seatpost side fully and unscrew, then return the bleed screw.

Bleed actuator

Hold the syringe upright, as before, and gently pull on the plunger to ensure there is no more air present. Press in the actuator while pulling up on the plunger of the syringe, then push down on the plunger as you allow the actuator to return to its normal position. Repeat this process five to 10 times to ensure there is no air inside the actuator.

Turn the speed adjuster fully to the fast (or '+') position, then back to slow – repeat this three times and leave in the fast position (or '+') direction. Again, pull up on the plunger to remove air.

Push on the plunger and return the speed adjuster to the slow position. Push in the actuator, then apply pressure on the syringe, slowly releasing the actuator to its extended position. You can now unscrew the syringe and return the bleed port screw.

Clean up any oil with paper cloth and degreaser, and return the actuator to the desired position on the bars.

Clean up using degreaser and paper cloth: clean up using degreaser and paper cloth
You can now set your seatpost to the required height and adjust the speed controller. Finally, give the system a test and you’re ready to ride.

DIY: Make Your Own Mountain Bike Fender

Bike Category: 

If you aren’t keen on the looks of a front fender or don’t ride in the mucky stuff enough to warrant the purchase of one then here’s a quick and cheap alternative to keep the grime out of your eyes.

Mud Guard

Mud flaps have been popular for years among penny pinching racers. For the cost of a beat-up old inner tube and a few cable ties these go a long way towards keeping the trail from ending up all over your face.

Cut Holes for Zip Ties

You'll need an old inner tube, some zip ties, and scissors. Wrap the inner tube around the fork, the fork's brace. Once the distance is measure cut it and split it down the middle. Make a dovetail cut in the top. Thread the zip ties through holes in the rubber and use them to hold the mud guard in place.

Cheap Road Bike Upgrades

Bike Category: 

Buying a new bike or a set of fancy carbon wheels is a surefire way to make you go slightly faster, and become a lot poorer. You can find extra speed on a budget though – here are five upgrades that could make a real difference without breaking the bank.

Tighter clothing

There’s tight and there’s aero tight. As a rider, you create far more drag than your bike does, so slimming your profile by reducing flapping material is perhaps the best upgrade you could make in the quest for speed. A close-fitting aero jersey and shorts will also be a lot cheaper than an aero frame or wheels.
Getting a bike fit

If your bike doesn’t fit properly, you’re missing out on your potential as cyclist. Buying speed doesn’t come any more cost effectively than creating harmony between rider and bike. There are loads of fitting options out there, but the fitter’s expertise is key in finding the best possible balance between power production and comfort.

Save your ass

An Ass Saver is a simple plastic shield that attaches to your saddle, but is well short of being a full fender. It might not make you a faster cyclist, but it’ll keep you comfortable when the rain comes down or the roads are wet by stopping spray soaking into your chamois – something that’s at best uncomfortable and at worst a source of rubbing that could end in painful saddle sores.

Drivetrain overhaul

A whole new groupset might save a few grams, but they’re expensive. If chainring / sprocket teeth or the chain itself are worn, you could experience mis-shifts, dangerous slipping while climbing and a loss in efficiency. Getting a new cassette, jockey wheels, chainrings and chain will get the whole system running as new. Recabling is another great way to improve shifting and braking if the cables are a few seasons old.