Install a Bashguard to Increase Ground Clearance

A bashguard is a plastic or aluminum ring that replaces the largest chainring. Its purpose is to increase ground clearance and help the bike slide over logs and rocks. It also protects the chainrings from getting bent.

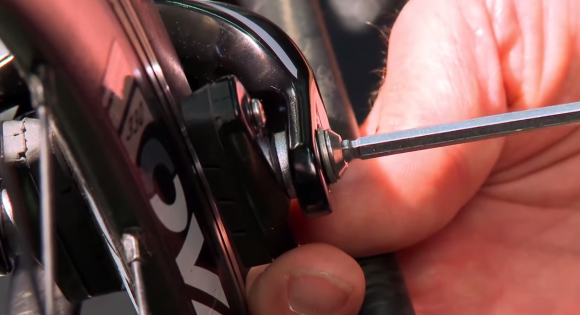
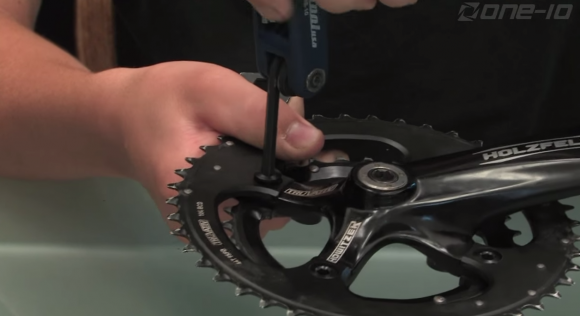
To install the bashguard it is usually necessary to remove the crank from the bike. There are 4 bolts that attach the chainrings to the crank. Using a chainring nut wrench and a hex key to remove the bolts.

Remove Largest Chainring

Remove the cranks and replace the largest chainring with the desired bashguard. Slide the guard on to the crank arm and align the bolt holes. Next, locate the alignment indicator on the chainring. This is usually a small knob on the sprocket. This knob should be placed in alignment with the crank arm.

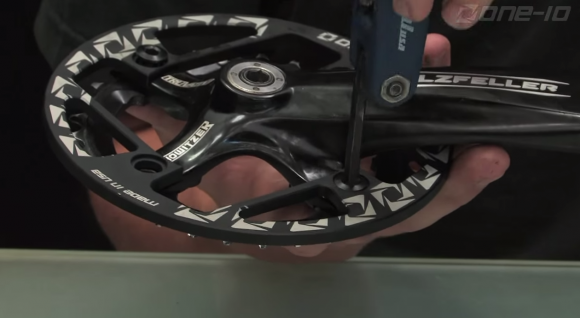
Install Bashguard on Crankset

Insert two chainring bolts on the chainring side of the assembly. Flip the crank over and insert the screws. Repeat this with the remaining two bolts.

Install and Remove SRAM Chain with Master Link

Company: 

Installing master links is really easy if you use this trick, but first make sure the master link is installed the right way. If you have a SRAM Chain, the arrow on the link should point in the direction the chain will travel.

Master Link in Place on Chain

The trick: with your link installed underneath the chain stay, back pedal the crank until the link is above the chain stay. Pull the rear brake, and hold it while you pedal forward. The link will pop right into place.

Use Master Link Pliers to Remove Master Link Chain

To remove a master link, the only trick is to use the right tool, such as MLP-1 master link pliers from Park Tool. They take a huge amount of headache out of the process.

Replace Road Bike Cartridge Brake Pads

Tools: hex wrench set.

First thing to do is remove the old pads. This will usually require a 1.5-2.5mm allen wrench. Remove the bolts and set them aside. New pads come with new bolts.

Once the bolts are out, slide the brake cartridge out of the brake cartridge holder. On both brakes it will slide out of the rear of the pad holder.

Slide Old Cartridge Brake Pad Out

To install the new cartridge you will need to open the brakes up again with either the barrel adjuster or tension bolt.

You will notice there is a slot in the pad where the bolt and the pad holder goes in to hold it in place. Line that slot up with where the bolt goes in at the rear of the brake pad. Slide the pad in and use the new bolt to secure it.

Once tightened, make sure the pad is in alignment with the rim. Key things to note are that the brake pad is parallel to the rim and about 1mm below the top of the rim. You can also adjust the toe end of the brake pad at this point to. Do this by loosening the main pad anchor bolt.

Adjust Brake Pad with Anchor Bolt

New pads will have a small break in period and then be as good as they’ve ever been.

Don't Waste Your Money: Tips for Maintaining Your Bike

These tips should be used after every ride and will help the increase the duration of your bike’s life.

First, grab hold of the tire and shake it side to side to check if there is any play in the wheel bearings. Then, move up to the saddle and shake it side to side and up and down to see if there is any play in the seat and the seat collar. The reason you want to do this is so you don’t come off after a ride and injure yourself.

Check Saddle and Seat Post for Movement

Move on to the bottom bracket. Wobble the crank arms from side to side to see if the bottom bracket area has any play. Move to the handlebars and check that your brakes have good force behind them. You need to make sure that these work correctly since they are the only thing on the bike helping you to stop.

Next thing to check is your headset. Pull on the front brake, shake the bike back and forth, and see if there is any movement in the headset. If this is damages and unnoticed you could break your forks and steerer.

Check your stem bolts, all four should be tightened or your handlebars will come loose. Move to the front wheel. Check it for play like you did the rear wheel.

Make Sure Stem Bolts are Fully Tightened

Bounce the bike on the ground. Listen for any odd noises or strange sounds. Pedal backwards to check for sound in the chain. If there are, put some lube on the chain. Lastly, clean your bike after each ride.

If you have any problems, check our TheBikeTube’s tutorials or hit a bike shop.

Shimano Dura-Ace Chain 10-speed

Company: 

Shimano Dura-Ace 7901 10-speed Chain Review:

Shimano’s chain has asymmetrical design, which provides better shifting and helps to prevent chain suck. This chain is at the top of Shimano’s range. The 10-speed chain provides the best interaction between your chain and your chain set. It provides maximum power transfer.

Shimano's Dura Ace Chain offering with a zinc alloy silver finish

Shimano's Dura Ace Chain offering with a zinc alloy silver finish

The inner plates of the chain are specifically designed and contoured to consistently deliver smooth shifting under load so you can expect efficient pedaling and near silent running. Durability is ensured by Shimano’s chroming process on the link pins and heat treatment of the rollers, pins, and plates.

Overall, the zinc alloy silver finish offers resistance to corrosion as well as an increased chain life.

Use Barrel Adjusters for Quick Adjustments

How to use a barrel adjuster:

Barrel Adjuster on Brake Cable

Barrel adjusters are a good way to make quick adjustments to your bike without using a tool. You make adjustments by tightening or loosening the screw. If the brakes are too loose and aren’t responding well, unscrew the barrel adjuster counter clockwise, then screw down the lock ring to make sure it stays in place. This will increase the tension on the brake cable helping it to respond quicker.

Adjustments Change Brake Lever Responsiveness

If you have the opposite problem, and your brakes are too tight. Loosen the cable by screwing the barrel adjuster in. Adjust to your personal preference.

Adjust Shimano Front Road Derailleurs

Company: 

How to adjust Shimano road front derailleurs:

All front derailleurs have the same basic adjustments. You have a low limit screw, a high limit screw, and the cable anchor adjustment.

The first step is to adjust the position of the derailleur. Loosen the derailleur bolt and move the derailleur to between 1 and 3 mm off the top of the teeth to the bottom of the derailleur cage. Make the outer cage parallel with the big chainring.

Before going to the next step make sure the barrel adjuster is turned all the way in (clockwise) to release any tension that may be in the cable and leave room to adjust it later. Next, shift the rear derailleur into the largest cog on the back, and have the front derailleur in the small cog.

Turn Barrel Adjuster In

Now, set the inner limit. The inner plate of the derailleur cage should be as close to the chain as possible without actually touching it. That means the inner limit screw should be tightened. Turn the pedals to make sure it isn’t touching the chain.

Adjust the cable tension. Pull the cable tight and tighten the cable anchor adjustment with an allen key. Shift the derailleur into the large chainring. You want a small gap between the chain and outer cage. Adjust using the upper limit adjustment screw. Now check by turning the pedals.

Test Derailleur Cage for Movement

If you can push the derailleur cage out with your finger, the cable tension isn’t right. Back out the barrel adjuster to give the needed tension. Test to make sure the chain shifts and stays on nicely.

Review: Shimano SLX M665 Crankset

Company: 

Shimano SLX M665 Double Crankset Review:

Shimano SLX M665 Crankset with Double and Triple Set-ups

Shimano’s cross-country and all-mountain bike crank set offering with two set-ups available. A double ring for all-mountain and a triple for cross-country riding, when a larger gear is usually required.

Shimano Hollow Tech Crank Arms

The double chainring combination comes with a 32/22 teeth set-up. Shimano has increased the reinforcement around the axle and the spider areas, and has also paired it with a honeycomb bash guard. The crankset also features Shimano’s hollow tech cranks, which are available in 170 and 175 mm lengths.

Review: Shimano XT M770 9 Speed Trigger Shifter

Company: 

Shimano XT M770 9 Speed Trigger Shifters:

Shimano XT M770 9 Speed Trigger Shifter

The 2-way release function on these levers allows you to shift the normal way, but also allows the upper lever to swing in either direction, which means you can release with either your thumb or your for finger.

Shimano have used a multi-bearing design in these levers to provide low friction and a reliable shifting action. The contoured alloy thumb release is durable. but also gives you precise shifts from a compatible 9-speed drivetrain.

Shimano XT M770 with Optical Display

The unit has an optical display, allowing you to easily see what gear you’re in. The display is also removable to allow use with any style of brake lever. The adjustable handlebar clamp allows you to place your shifters wherever you want them.

Use an M-check to Make Sure Bike is Working Before A Ride

Prior to going on a bike ride, you want to check your bike over to make sure it’s safe for the ride.

We use the M-check. It starts at the derailleur, up to the saddle, down to the bottom bracket, up to the handlebars, and down to the front wheel. During the M-check, it is always good to check your frame for any wear or damage.

Start at the derailleur, checking it over for any wear. Also, make sure the cable is not frayed or worn. Check the chain for kinks and make sure it is true. Check the cassette by doing a run through of the gears and make sure everything is switching properly.

Move on to the hub. Give the hub a wobble to make sure there is no movement. Check the skewer holding the wheel for proper tension. Then move up to the tire. Make sure there are no cracks or balding, as well as tire pressure. Lastly, check the brakes.

Check Hub for Wobble

Move up to the saddle. Make sure it is straight and that there is no movement. Move towards the bottom bracket. There should be free rotation of the crank. There should be no movement in the bottom bracket when giving it a wobble.

Move Handlebars to Check Headset for Play

Near the handlebars, take hold of the brakes. Make sure the brake levers are functioning properly. There should be no play in the headset or any of the gear levers. Check the front tire. Make sure there is free movement, and check the brakes.