Install a Hope Technology Press Fit Bottom Bracket

Company: 

How to fit a press fit bottom bracket:

First, make sure all surfaces and edges are clean. Apply a small film of grease where the shells will slide in.

Take the tool, making sure you are putting the correct cup on the correct side, and slide the tool through the cup. Take a 27 mm spanner to secure the tool and an adjustable for the other side of the tool. Gently wind the tool in. When you feel the cups meet in proper positions do not try to crank further. Then, wind the nuts off to remove the tool. Now, fit the other cup with the same method using the press fit tool. Keep an eye on the edges.


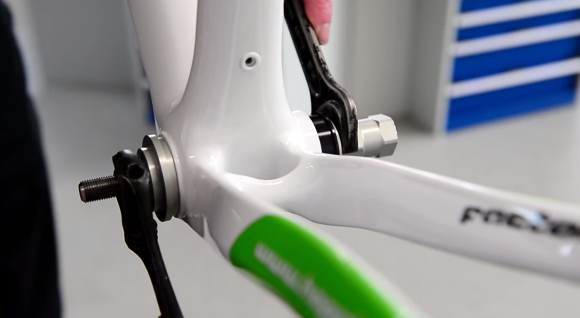
Use a 27mm Spanner and Adjustable on BB Tool to Install Bottom Bracket Cups

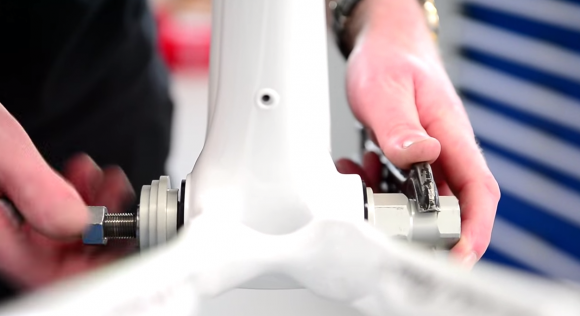
Take a small unit of grease to where the washer is going to sit on the center tube and threads. Use the opposite end of your tool to thread in the center tube. Make that tight. It will hold both cups in place.

Hope Press Fit BB Tool

Now use the tool to press the bearings into place, again making sure not to go further than necessary. Apply a little bit of grease and press the seal into the groove on the bottom bracket. If you are using a spacer, use the tool again to pull the spacer into position. Remove the tool and you are good to go.

How to Bleed Hope Brakes

Company: 
Bike Category: 

How To Bleed A Hope Brake:

Before we start anything on the bleeding procedure, we need to make sure the mast cylinder is level, so now fluid will be lost from the master cylinder when removing the lid. Then, take out the T10 torx screws on the lid. Carefully remove the lid. Wipe away the excess oil and dirt.

Next, remove the rubber cap from the blade nipple to fit the spanner and bleed hose. Always rap a little tissue around this for extra protection.

Fill the master cylinder up with oil. Make sure not to overfill it. Then, we can start the bleeding procedure.

Fill Hope Brake Master Cylinder with Oil

If you unscrew the bleed nipple a quarter of a turn, then pull the master cylinder lever in and lock your bleed nipple off. If you keep repeating that a few times- making sure there are no bubbles coming out- then you can try unscrewing the bleed nipple, and pushing each individual piston back. This will move any pockets of air.

Remove your diaphragm from your cap, making sure all the breather holes are clear and wipe anhydrite away. Once the master cylinder is full, roll the diaphragm in. Pop the top back on.

Undo the 4mm allen keys, and move your lever so it is directly pointing down. This will help get rid of the air by pumping the lever. Once repeatedly pressing it, the air should rise back up into the master cylinder.

Use Screwdriver to Push Back Brake Pistons

Remove the cap for the final finishing procedure. Push all the pistons back using a screwdriver. Be careful not to damage anything. Wipe away any excess oil. Top the master cylinder off with oil. Roll the diaphragm in and reinstall the cap.

More Protection, Less Weight: POC Octal Helmet Review

Company: 

The POC Octal Road Helmet not only offers more protection than most high-end road helmets, it weighs less. With extra coverage, especially at the temples and the back of the head, the Octal will reduce your chances of injury in the unfortunate event of a crash. And should the worst happen, the helmet includes a scannable ICE tag that will allow medical personnel or passers-by to find your identity, medical information, and emergency contacts.

POC Octal Helmet

The Octal's EPS liner is strategically designed for extra thickness in the most exposed areas, and it's entirely covered by the outer PC shell. The unique, fully-wrapping unibody shell construction functions as a monocoque, enhancing the helmet's protection qualities as well as its integrity of construction while keeping it impressively lightweight. In addition, POC has done something new with the Octal's ventilation system—instead of many small vents, the Octal features larger vents, resulting in more open surface area at the front, which, in combination with a specially-designed interior, allows more air flow through the helmet than comparable helmets.

Many Vents Make the Helmet Weigh Less

The Octal's ultralight size adjustment system ensures a comfortable and secure fit without excess contact with your head. Internal Coolbest padding regulates temperature to help you keep a cool head in hot weather. Reflective patches enhance visibility. A built-in eyewear garage keeps your sunglasses secure and easily accessible when you're not wearing them.

"Future Vintage Saddle": Fizik Volta

Company: 

Fizik 2014 Volta Saddle:

This is Fizik's first u-shaped saddle. The Vota was inspired by the old classic styles, such as the rolls, the strata, the concord, the flight, and the turbo.

Fizik Volta Saddle is U-shaped and Inspired by Vintage Saddles

To make this saddle, Fizik did as scan of all of these shapes, worked closely on a few lines, and came up with the Volta.

Fizik likes to call it a future vintage saddle. It was inspired by old vintage saddles, but has been given some modern, 21st century technology. The base and the rails are full carbon fiber.

Fizik Volta has Carbon Base and Rails

The rails are attached by 5 rivets which you can remove, so the rail is replaceable. A window is cut in the center of the carbon fiber base, and injected is a rubber piece so you get more flexibility in the saddle.

Aerodynamic Test: Disc Brakes vs. Rim Brakes

Many people have experienced how great disc brakes are, while others still have a lot of questions about them. A big question is how aero disc brakes are.

This video will test one disc brake and one rim brake to see what the difference actually is. The frames of the bikes tested will be the same, with the only major differences being the brakes, the hoods, and the rims.

Rim Brake

Like every other test done in here, we try and keep everything that we are not testing equal. In this case, with the wind head on, there was actually no difference between the two set ups.

Disc Brake

When a crosswind was introduced, we started to see a little bit of a difference. Over our standard 40km distance, we saw that the disc brakes were about 8 seconds slower than rim brakes.

With a crosswind, rim brake wins slightly

Some people may be surprised by how close the disc and rim brakes were actually, but when looking straight on at the bike you can see there is little in terms of different exposures. When a little bit of a crosswind is introduced right on the disc brakes, they slow down a little bit. However, if you are doing rides with a lot of descending or tight corners, that little bit of extra confidence the disc brakes will provided may help wipe out those 8 seconds over the 40 km. So really it is the whole package and not just the aero you should worry about.

Install a 42-tooth Sprocket on a 10-speed Cassette

Bike Category: 

One Up Components 42 Tooth Sprocket:

This is designed for SRAM and Shimano’s 10-speed drivetrains, which use 11t-36t cassettes.

42-tooth Sprocket for 10-speed SRAM or Shimano Cassette

For this particular you will need a chain whip, cassette tool, phillips head screwdriver, and a 5mm allen wrench.

The first thing you are going to do is shift into the smallest cog and release the clutch mechanism on the rear derailleur. Using a 5mm allen, remove the axle and drop the wheel out of the dropouts. Next, secure the cassette with the chain whip and use the cassette tool to back off the cassette lockring.

Remove Cassette Lockring with Chain Whip and Cassette Tool

In order to make room for the 42 tooth sprocket, you need to remove the 17 tooth cog from the middle of the cassette. Depending on what brand cassette you’re using, the provided spacer will either go on the front or back side of the one up sprocket.

For a Shimano cassette, place the spacer on the back side of the sprocket against the hub. Just like any hub, line up the thick spline with the thickest groove on the free hub body. Next, reinstall the rest of the cassette without the 17 tooth sprocket and its spacer. Next, reinstall the lockring, then reinstall the rear wheel.

Remove the 17-tooth Sprocket to Make Room for 42-tooth Sprocket, then Reinstall

Because this rear derailleur is set up to work with a 36 tooth cassette, we will need to readjust the b-tension screw to accommodate the larger diameter. With the b=tension adjusted all the way in, it gives just enough clearance to have it jump up on the 42 tooth sprocket with no problems.

Top 5 Inexpensive Mountain Bike Christmas Gifts

Top 5 Mountain Bike Christmas Gifts:

1- GoPro Hero- the GoPro has become eponymous in the world of wearable camera technology. As of 2014, you can now buy a GoPro without breaking the bank. Whatever you choose to do with it, the basic GoPro is available now with everything you need for sharing whatever it is you want.

2- Hope 40T-Rex- If you’re not familiar with running a 1x group set, it’s basically a way of eliminating your front derailleur. The problem is you either need strong legs or a wide range of cogs on your cassette to make it up the steepest climbs. British CMC artists, Hope, have made this ratio expander out of a single block of aluminum. Now, just remove one of your cassette sprockets and put on this 40T ring. Now you have a cassette more geared for a 1x set-up.

Hope T-Rex 40 tooth Cassette Ring

3- Google Chromecast- Plugs into your TV’s hdmi output. With a wifi connection and the right mobile app, you can send numerous online channels direct to the TV.

4- Charge Spoon Saddle- This isn’t a particularly new saddle, but it is available in a ton of colors. If you don’t like what is offered, you can use Charge’s custom saddle builder to configure the perfect accessory. You can even share your creation via social media to drop a hint for someone else to get.

Customizable Charge Spoon Saddle

ODI AG1 Grips- once you’ve found the perfect saddle, get the drips to match.

Aaron Gwin Designed ODI Grips

5- Tickets- like to the World Cup downhill events that take place in a small Scottish town in June to watch the world’s best riders on one of the most demanding tracks.

Bar Mitts Handlebar Warmers Overview

A built-in hand warmer that goes on a bicycle?!?!

Bar Mitts Overview:

To get people to ride in the winter, we are always looking for some products that make it easier to ride. Bike Mitts has gotten everyone excited.

Bar Mitts Cover Shifters and Brakes to Keep Hands Warm at All Times

Bar mitts can be used without gloves or you can keep your gloves on. Either way, you stick your hands into the bar mitts on your bike and they will be protected from the wind while you are riding.

Bar MItts Attach with Velcro and Zippers

The Bar Mitts are fully removable, using velcro and zippers to connect it and keep it on to the handlebars of your bike. They will work with any bike, and even come in different version for drop bars.

Chrome's SPD-compatible Truk Shoe

Company: 

Not only handsome, but comfortable too. The Truk Pro is Chrome's newest SPD-compatible shoe, serving up some of their latest and greatest technology in a classic urban design.

 Chrome's newest SPD-compatible shoe

Chrome's newest SPD-compatible shoe

This is made possible largely thanks to Flexplate™ technology, a dual density sole which offers an an ideal balance of pedaling performance and walking comfort. A rubber outsole keeps you in an upright position when walking around town, and the durable rubber heel cup and tough cordura exterior mean business, on and off the bike.

The Truk Pro is available in Black and is compatible with two-bolt SPD cleats.

Features: Dual density FlexPlate™ Technology delivers unprecedented walking comfort Durable rubber heel cup with reflective details 100% Vulcanized construction Contoured impact-resistant PU footbed Skid resistant contact rubber outsole Abrasion-resistant 1,000 Denier Cordura upper Built in: Thailand

Chrome Makes Great Products to Complement the Urban Cyclist