How to Check and Adjust a Rear Derailleur

How to adjust your rear derailleur:

What does your rear derailleur actually do? It is responsible for moving your chain from one cog to the next. It does this by pushing or pulling the chain an exact amount determined by the shifter. Only a few things can cause your rear derailleur to dysfunction: hangar alignment, limit adjustment, cable tension, or broken equipment.

Almost all of these issues can be repaired with a phillips screwdriver, 5mm allen wrench, rag, and chain lube.

Equipment check: Look to see if your cable or housing is frayed or broken. If it is, replace it. Next, make sure your shifter has the correct amount of clicks. Do this by shifting through all the gears. Lastly, inspect the rear derailleur for damages, broken jockey wheels, bent parts, or broken springs. In most cases, if you find this kind of damage, the rear derailleur will need to be replaced.

Hanger alignment: you can see if your derailleur hanger is misaligned by looking at it from behind the bike. You want to see if your chain runs in a straight line from the jockey wheel to the cassette. If it isn’t straight then work needs to be done.

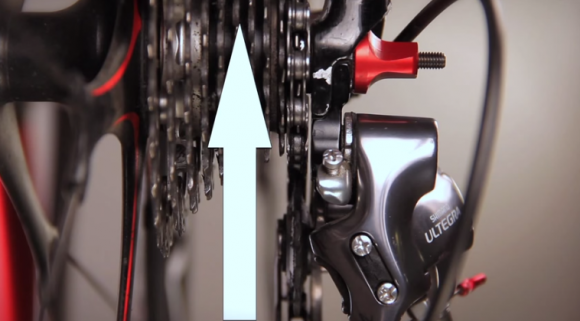
Chain should run in a straight line from the jockey wheel to the cassette

Limit adjustment: the rear derailleur limit screws determine how far the rear derailleur can move. Before adjusting the limit screws, detach the cable from the derailleur. Adjust the high limit screw first to move the derailleur to the correct position. After the high limit is set, use your thumb to push the derailleur to the correct low limit, then set the screw to prevent the derailleur from moving past the lowest gear.

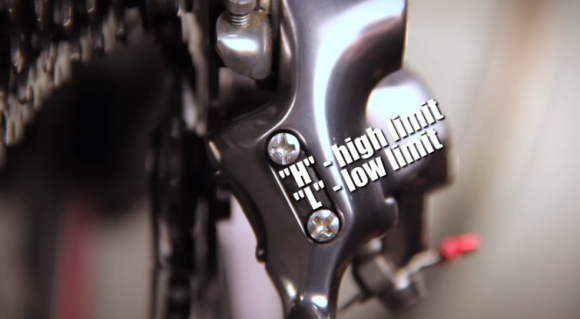
Rear Derailleur Limit Adjustment Screws

Cable tension: start by returning all barrel adjusters to the closed position. Then shift into the highest gear. Finally, pull the cable taut with your fingers and clamp it down to the rear derailleur.

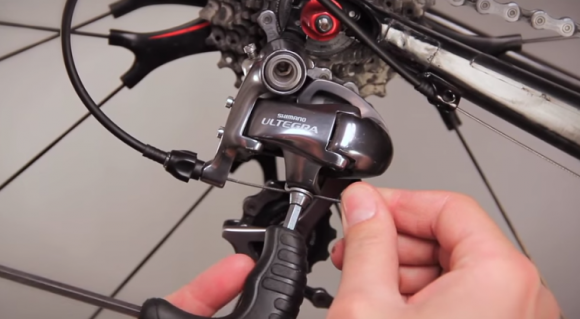
Use allen wrench and hand to adjust cable tension

Fine tuning: do this by pedaling and shifting. If gears don’t shift, try tightening the cable barrel adjuster. If it over shifts, then the cable is too tight and the barrel adjuster should be loosened. Finally, add some grease to the pivot points of the derailleur. Chain lube works just fine.

How to Check Road Brake Equipment and Make Adjustments

Company: 

How to adjust your brakes:

For this job, you’ll only need a 4,5, and 6mm allen wrench, and a phillips screwdriver.

Before you get into adjustments, it is a good idea to make sure that your equipment is in tact. Start by checking the cable and housing to make sure it isn’t cracked or broken. Now look at your brake pads. Are they worn down? There usually is an indicator line on the pad to tell you when you are getting close. Otherwise, just use your judgment. If they look worn, then they probably are. Next, check the caliper mounting bolt to make sure it is tight. The bolt head is located on the backside of the fork or bridge. It should be pretty tight, but not overly tight. Now, squeeze the caliper together. Does it return properly? If not, the spring may be broken and the caliper should be replaced. Do the barrel adjusters work correctly? Once you think your equipment is in good shape, move on to pad adjustment.

Adjust Caliper Mounting Bolt with an Allen Wrench

Pad adjustment: before doing any adjustment to your brakes, first make sure your wheel is in the dropouts correctly (meaning it isn’t crooked). To adjust, start by loosening the brake pad bolt. It will now move freely. Align the pad on the middle of the rim, running even with both edges. You can even squeeze the lever to hold it in position while you tighten the bolt.

Align Brake Pads on Middle of Rim

Caliper alignment: with your pads in the correct position, the right way to align your brakes is to first loosen the caliper bolt, center the caliper by eye, then tighten the caliper bolt back down. Now all you have to do to fine tune it is use your hand to twist it into position. You want the pads to be evenly spaced on both sides of the rim.

Cable tension: start by retuning all barrel adjusters to the closed position. Now release the cable from the caliper by loosening the cable clamp bolt. Use your hands to squeeze the caliper against the rim and pull the cable tight.

Adjust Cable Tension By Holding Down Caliper with Hand

Fine tuning: squeeze the brake over and see if it pulls to where you want it. If not, fix it with cable tension. If the lever engages too soon, then loosen the cable clamp bolt, while holding the caliper, and open the brake just a little more. If the lever goes to far or doesn’t engage enough, then tighten the cable by opening the barrel adjuster, or by loosening the cable clamp bolt, closing the caliper, and tightening.

Great Introductory Tutorial: Parts of a Bike Headset and How to Adjust

Let’s talk about adjusting your headset.

You might not even know what your headset is, and if you do, you might not know if it’s loose or not. But, if it is, chances are you had heard that clunky sound at the front end of your bike.

Before you can adjust your headset, you need to know what your headset is made of: there is the crown race, which is pressed on to the fork with a special tool.

Crown Race. This part of the headset is pressed onto the fork with a special tool.

Your bottom bearing sits right on top of that, and that will sit inside the bottom cup. The top bearing goes into the top cup on the frame.

Top cup on the frame. The upper bearing will go in here.

Above the top bearing is the top race, which goes in to hold the top bearing in place, and wedges right down inside of it. After you install the top race, you cover the whole thing with your dust seal that slides right on top.

Dust Seal. This covers the upper bearing and top race.

From there, you add your spacers, your stem, top cap, and headset adjustment bolt. Now that you know how your headset goes together, the next thing you need to know is that all the adjustment is made from the adjustment bolt.

The adjustment of your headset centers on the adjustment bolt.

As you tighten it down, it essentially pulls the fork up into the frame and compresses the whole system. Before you go into adjusting this bolt, always make sure your stem bolts are loose.

How do you know if your headset needs to be adjusted?

Basically, there are two tests. First test is to see if it is too loose, which is the most common problem. To test this all you need to do is grab the front brake and rock your bike back and forth. You are feeling for any play between the top dust seal and the top bearing cup, or the fork and the bottom bearing cup. If there is, chances are the headset is too loose. To adjust it, loosen your two stem bolts, take your allen wrench, and tighten down your headset adjustment bolt.

Use an allen key to tighten or loosen the adjustment bolt.

The next test is to make sure the headset is not too tight. To do this, lift the bike up a little bit, grab the handlebars, and make sure they spin freely. Chances are if you pass both those tests, you are good to go.

How to Install a SRAM Bike Chain

Company: 

Chains are where you can get a lot of grit and just plain dirtiness accumulating so it’s something you should clean and maintain on a regular basis. If you need to install a chain, remember to get one that is compatible with your system because the larger the number of sprockets you have on your bike, the thinner the chain you will need. A thin chain for a 10-sprocket bike can theoretically be used on sprockets designed for wider chains.

The inverse is not true. You cannot use a chain from a single-speed bike (wider sprocket) on a 10-speed (thinner and multiple sprockets).

First, you’ll need to size the chain. To do that, you’ll need to click the shift levers so that the front derailleur is on the largest chainring and the rear is on the smallest sprocket. Thread the new chain over the big sprocket and chainring. You don’t need to thread it through the derailleurs just yet. Measure off where the chain meets and then count two pin-holes of extra chain links. REMEMBER: you must cut the chain so that it ends with the inner plates and not with the outer plates. If the measurement lands right on a link with outer plates, cut the chain one link up so you end up with inner plates and not outer ones. SRAM uses what they call a “power lock”, a master link that has an elongated pin-hole and is used to connect the ends of the chain.

Bike Chain Inner and Outer Plates

Use your chain break tool to cut the chain and then proceed to properly thread it through your derailleurs. Now attach your power lock.

In order to tighten and set the lock, pass the chain through till you get the lock sitting right above of the chainrings. Tensing the chain with the crankarm and the back tire, this action should pull the chain enough so that the lock can set. 

NOTE: The chain explanation in the video happens about halfway through but since it is SRAM, I decided to stick with this  video in particular.

Choosing the Ideal Mountain Bike Handlebars

Bike Category: 

A guide to picking the ideal MTB handlebar:

The first thing to make sure of when picking out the perfect bar is that you have a compatible stem and bar clamp zone. The old standard is 25.4 mm. The new oversized is 31.8 mm, which is quickly becoming the new standard.

The next thing you want to check out is the material on your bar. There is carbon, steel, aluminum, and lots of different choices for your bars.

The three most important features of a bar are the rise, the sweep, and the width. The rise has to do with how much the bar comes up from the stem and can make up for the amount of drop you have on the bicycle. If you need to sit more upright you can get a bar with a rise. The sweep has to do with how much it comes back towards the rider. The width is how wide the bars are. More width will equal more leverage on the wheel. Keep in mind, you can always cut down, but you can’t add.

Mountain Bike Handlebar with a lot of sweep

Grips are also very important. First option is a standard rubber grip. Another option is a foam grip, which are lighter weight and softer. Lastly is an ergonomic style, which is designed to support your hand better. Also available are bolt on bar ends for a second hand position.

Ergonomic Mountain Bike Handlebar Grips

Most importantly, get your hands on some and try it out.

Adjust Shimano Dura Ace 9000 Hubs & Typical Cone or Cup Bicycle Hubs

Company: 

Adjust Shimano Dura Ace 9000 Hubs:

Before getting specifically into Shimano Dura Ace Hubs, it is important to understand how to adjust a typical cup or cone hub. With this hub, you have a threaded axel with a cup/cone and locknut to hold it in place. To adjust the cone, you first need to loosen the locknut. Use a cone wrench to hold the cone and an open end wrench to loosen the locknut. Then, very lightly tighten down the cone until you feel it contact the ball bearings. Tighten down the locknut by hand onto the cone.

Use a cone wrench to hold the cone on the hub and an open end wrench to loosen the locknut.

If done right, the axel will feel a little rough at this point. Now, use your cone wrench to tighten the cone down against the locknut. It should be tight, but this doesn’t require strenuous effort to tighten. If the axel rattles, use two open end wrenches to tighten down both locknuts just a tiny bit to get to where you need to be. If the axel turns roughly, use two cone wrenches to back off the cones slightly. If either of these adjustments takes more than a tenth of a turn, start over and get your cones in a better position.

For Dura Ace 9000 hubs, adjustment is straight forward. Both the front and rear, use the same process for adjustment. Use two 5mm allen keys inserted into each end of the axel to unscrew the non-drive side end cap bolt. Pull the other end cap off to expose the cone adjustment. Turn it by hand until the axel is rattle free, then put the black cap back on the axel to lock down the adjustment. Line up the wrench flats on the axel with the flat edge of the keyway on the adjuster cap. Because small splines on the inside of the cap lock the adjuster in place, you can tighten the axel end cap bolt, which serves as the axel locknut, with two 5mm allen wrenches.

Line up the wrench flats on the axel with the flat edge of the keyway on the adjuster cap

Rebuild RaceFace Atlas Bike Pedals

Not only are RaceFace Atlas pedals incredibly easy to rebuild, but also really tough and light.

The first step is to use a 3mm allen to remove the spare pin form the end of the axle. Then, remove the end cap from the end of the pedal with a 6mm allen. Now we need to remove a 2.5mm allen from the end of the spindle. We’re going to hold the end of the spindle with an allen wrench, then take a 2.5mm allen and back this out. The remove the spindle.

Remove Pedal End Cap with 6mm Allen Wrench

Next, take a flathead screwdriver and remove the seal. Use an 8mm allen wrench to pop out the 3 small bearings outside of the pedal. Now it’s time to remove the large inner bearing. We’re going to use a special tool that is supplied with the pedal rebuild kit to push out the big bearing. Insert the tool with the flat end pointed down underneath the bearing, then take your 8mm allen or a long punch, put it in through the other side, and tap out the bearing with a hammer.

Use a Flathead Screwdriver to Remove Seal and Expose Bearings

Now, the pedal is fully stripped and is ready to have new parts installed.

Grease up the bearing seat. Take your new bearing and drop it in, then take the tools supplied with the kit, put it in the pedal, and use your hammer to tap it into place. Take the seal and put it in over top of the bearing and press it in with your fingers. Make sure it is seated all around into the groove in your pedal so that it stays put. Take the three outboard small bearings and install them into the end of the pedal. Use the same bearing press tool as you used on the other bearing, and use the opposite end to seat those small bearings on the outside of the pedal.

Reinstall Pedal Spindle with 8mm Allen Wrench

Grease up the bearing interfaces on the spindle, and install it into the pedal body. Use your 8mm allen to hold the spindle in place and take your small 2.5mm allen bolt and insert it in the end. Then install the 6mm end cap, and lastly, install the spare pin.

Install a RaceFace Narrow/Wide Single Chainring

Company: 

RaceFace’s new chainring has a narrow/wide narrow tooth profile. It retains the chain without the need of a guide or a keeper, and it’s reducing some weight.

Look at RaceFace's Narrow/Wide Single Chainring

Look at RaceFace's Narrow/Wide Single Chainring

A lot of riders are getting into the 1x drive systems because it simplifies the ride, they’re still getting all the gearing they need with today’s wide range gearing ratios on the cassette, and it reduces some weight.

Install Chain on Chainring after Tightening

Install the chainring on the cassette using allen keys, and a large hex if the cranks need to be removed or tightened. Once the chainring is on the cranks, install the chain.

Install Wolf Tooth Components' 42 Tooth Giant Cog

We're going to install the 42 tooth giant cog from Wolf Tooth Components. The cog in this video is for a Shimano cassette. We're going to replace the 17 tooth cog and spacer from the cassette and put the giant cog in as a replacement.

First thing to notice is that there are ramps on the cog. This will help you determine the proper direction of the cog. It should be installed with the writing on the cog facing outward away from the spokes of the wheel rim.

Make Sure the Giant Cog is Placed on the Hub Facing the Correct Direction

The cassette set in this video is an XTR set. The pieces of the cassette are stacked and placed on the hub one at a time. Rather than adding the 17 tooth cog. It is taken out and the 15 tooth goes on the cassette without the 17 tooth next to it. Put the locking on at the end to secure the tightness of the cassette.

Tighten with a Cassette Tool and Wrench

The packaging from Wolf Tooth components also comes with a longer B-nut screw to help prevent the derailleur from hitting the giant cog.

Overview of Shimano CX70 Cyclocross Components

Company: 

Shimano unveils new CX70 cyclocross components:

The cross group is made up of the primary components of cantilever brakes, front derailleur, and cyclocross specific cranks. Those three parts now give us a full Shimano entry into cyclocross racing.

The brakes have been one of the most notable absences from the cyclocross offerings. The CX70 cantilever brakes are designed to work with all the new SLR brake levers. They come with great power and clearance. They also have hourglass spacers to help keep mud from building up. The CX70 also has a removable brake cartridge system to easily swap out brake pads.

Shimano CX70 Cyclocross Brakes

The crankset is based on the Ultegra hollow tech crank arm. It has cyclocross specific 46 and 36 tooth chainring configurations. In order to achieve the optimal shifting with that front chainring, there is a dedicated CX70 front derailleur in a multitude of pull and mounting styles. There is a bottom pull and a top pull offered with two different clamp diameters as well as braze-on.

Shimano CX70 Front Derailleur and Crankset

Shimano is well known for its front shifting and this setup continues that tradition with super fast and reliable shifting. The move front the chainrings in very fast, and the 46 tooth chainring is designed with several ramps to ensure quick shifting under load and power.

The CX50 group will also become available as a slightly lower end group. It does not have hollow arms, and will have slightly heavier brakes, but a lower cost.