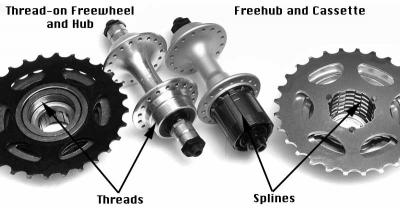
First things first: a freewheel is not a cassette. There are several differences between the two. In a cassette, the ratcheting mechanism is part of the hub and is integrated, not screwed on. A freewheel is threaded onto the hub. A way to tell is to look for a flat lockring on top of the smallest cog. If it has splines or grooves, it is a cassette and not a freewheel.
Cassettes are used more typically nowadays, whereas freewheels can be found on older bikes.
You also have to remember that most companies make their freehubs non-compatible with cassettes from other companies. So if you have a Shimano cassette and need to replace a cog, a Campagnolo will never work because they are splined differently.
In order to remove the cassette, you’ll need a freewheel or a cassette lockring removal tool (make sure you get one specific to the group you have on your bike because some tools are handle-like and others are cyclindrical; due to the explanation above regarding the specific splines of each make, you will have to obtain a tool for your particular cassette), a wrench (if you have a handle-like cassette removal tool, you won’t need this) and a chain whip.
Secure the chain whip to the cassette. Take out the skewer and insert the removal tool. Adjust the crescent wrench on the tool and place it at an angle. If the wheel were a clock face, you’d hold it at 10 o’clock. Holding the tire upright, press down on the cassette tool or wrench. Depending how hard you ride your wheels or how much you’ve ridden can affect how tightly wound the cassette is to the hub.
To put on a new cassette, lightly grease the freehub, line up the splines with each cog and then put on the lockring and tighten by hand. Use the cassette tool to finish tightening and you are ready to go!